# Introducing DefiTuna

## Our Mission

The team comes from a DeFi centric background where earliest primitives were always pushed to their limits. We've decided to contribute to the space by putting all of our collective experience together to bring about a change to this space!

## How DefiTuna Works

When you trade on DefiTuna, you’re using our Spot Market.

* Traders can place Maker orders (also known as limit orders) or Taker orders (buy/sell instantly). They can also open leveraged spot positions (learn more [here](/dive-into-defituna/trade/onboarding/how-to-open-a-leveraged-spot-position)).

But behind every trade, there’s Liquidity Pools.

* Liquidity Providers deposit their tokens into these pools.
* The pools automatically execute buy and sell orders, making Liquidity Providers the true market makers.

Behind every Liquidity Provider stands a Lender, fueling deeper markets.

* By supplying assets, Lenders give Liquidity Providers and Traders the ability to add leverage to their positions.
* This makes the market more liquid, more efficient, and gives lenders attractive yields in return.

**This synergy is what makes DefiTuna unique: a complete ecosystem where every participant reinforces the others**

## The Bigger Picture

At DefiTuna, everything comes together in one place: Traders, Liquidity Providers, and Lenders.\
This three-pronged design gives everyone a seat at the market — whether you’re trading, farming, or lending.

By combining a Spot Market with Liquidity Provision and a Lending layer, we create a complete, self-reinforcing ecosystem.

* Traders get the most efficient and reliable DEX experience.
* Liquidity Providers gain powerful tools to farm, hedge, and leverage.
* Lenders enjoy attractive yields while enabling deeper liquidity.

**All of this serves one ambition: to deliver the most efficient and reliable AMM on Solana. And if we’re not delivering the best User Experience — we’ve failed.**


# Getting Started

**What do I need to trade on DefiTuna?**

* Make sure your wallet has enough SOL to cover transaction fees. We recommend keeping at least 0.05 SOL.
* Ensure you have sufficient collateral for the relevant pair. For example, if you're planning to open a SOL/USDC position, make sure your wallet is funded with either Solana (SOL), USDC, or both.

{% hint style="info" %}
We currently support Solfare, Phantom, Backpack, Jupiter, Glow, MetaMask, Brave, OKX and Squads wallets.&#x20;
{% endhint %}

{% hint style="warning" %}
If you’re connecting to DefiTuna on mobile, make sure to use your wallet provider’s in-app browser to connect your wallet to the website.
{% endhint %}


# Trade

{% content-ref url="/pages/lCPTpwauG8sQ5lbpWB5d" %}
[Why Trade on DefiTuna](/dive-into-defituna/trade/why-trade-on-defituna)
{% endcontent-ref %}

{% content-ref url="/pages/M5oT8FUm2JxMsDLhKFMV" %}
[Fusion AMM Mechanics Explained](/dive-into-defituna/trade/fusion-amm-mechanics-explained)
{% endcontent-ref %}

{% content-ref url="/pages/RUJT572Uf84EGfjTIOlY" %}
[Onboarding](/dive-into-defituna/trade/onboarding)
{% endcontent-ref %}

{% content-ref url="/pages/tbLHHIDzGuBFpryvYVmT" %}
[Platform Info](/dive-into-defituna/trade/platform-info)
{% endcontent-ref %}


# Why Trade on DefiTuna

DefiTuna is built on [**Fusion AMM**](https://fusionamm.com/), a next-generation liquidity engine designed for traders. Whether you’re swapping tokens or placing limit orders, you benefit from **deep liquidity, high-performance execution, and fully on-chain transparency.**

#### **Fully On-Chain, Deep Liquidity**

Every trade on DefiTuna is executed fully on-chain, with no hidden off-chain mechanisms. Fusion AMM concentrates liquidity into precise price ranges, giving you better prices and lower slippage—especially important for larger trades or volatile markets.

#### **Reliable, On-Chain Limit Orders**

DefiTuna is the first AMM to support fully on-chain limit orders without relying on off-chain cranks or keepers. Your limit orders are reliable and won’t fail, even in fast-moving markets. What’s more, when your limit order is filled, you earn the trading fees, turning your order into a source of yield while you wait for your target price.

#### **Smarter Routing & Execution**

Fusion AMM routes trades efficiently across liquidity ranges (ticks), ensuring your swaps clear smoothly with minimal risk of failure. This means better execution, less slippage, and more reliable outcomes for traders.

#### **Transparent & Fair Fee Model**

Every swap generates fees that are distributed fairly between limit order providers and the protocol. With no off-chain dependencies, you always know exactly how fees flow and can trust the system to operate transparently.

***

When you trade on DefiTuna, you get deep on-chain liquidity, reliable limit orders, and tighter execution—all **powered by a first-of-its-kind AMM design built for the future of DeFi on Solana.**


# Fusion AMM Mechanics Explained

{% hint style="danger" %}
*Any comparisons to other protocols are made solely for context and are not intended as promotion or criticism.*
{% endhint %}

### The Problem <a href="#the-problem" id="the-problem"></a>

Liquidity pools are great! They have a bunch of really cool features and allow for a ton of cool use cases that wouldn't be possible without them. But traditional order books still have one feature that Liquidity Pools (LPs) don't: limit orders.

{% hint style="info" %}
A **limit order** is an order to buy or sell an asset at a specific price or better. It guarantees the price, but not that the trade will be executed.
{% endhint %}

Order books are good at these... because that's all they are: a set of limit orders. If you want to buy or sell **right now**, you have to pick the best limit order in the book and use that as the counterparty to your trade. Liquidity pools are really good at this kind of order because of how they keep track of price and handle orders. But if you want to set an order to execute at a certain price in a liquidity pool, things get a bit trickier.

<figure><img src="/files/pGxDElgRszPRPIEMZy4Y" alt=""><figcaption></figcaption></figure>

The image above is showing a simplified visualization of what a SOL/USDC LP might look like at some price. As you can see, the current price is not where we want to trade. LPs, however, don't store discrete orders. They represent a continuous price curve where liquidity exists at all points between ranges, so you can't "wait" for price like in traditional limit order books. Under the hood, they keep track of what the current ratio of tokens is (the price) and how it should change as tokens get added or removed, but they don't keep track of when/if someone wants to buy or sell.

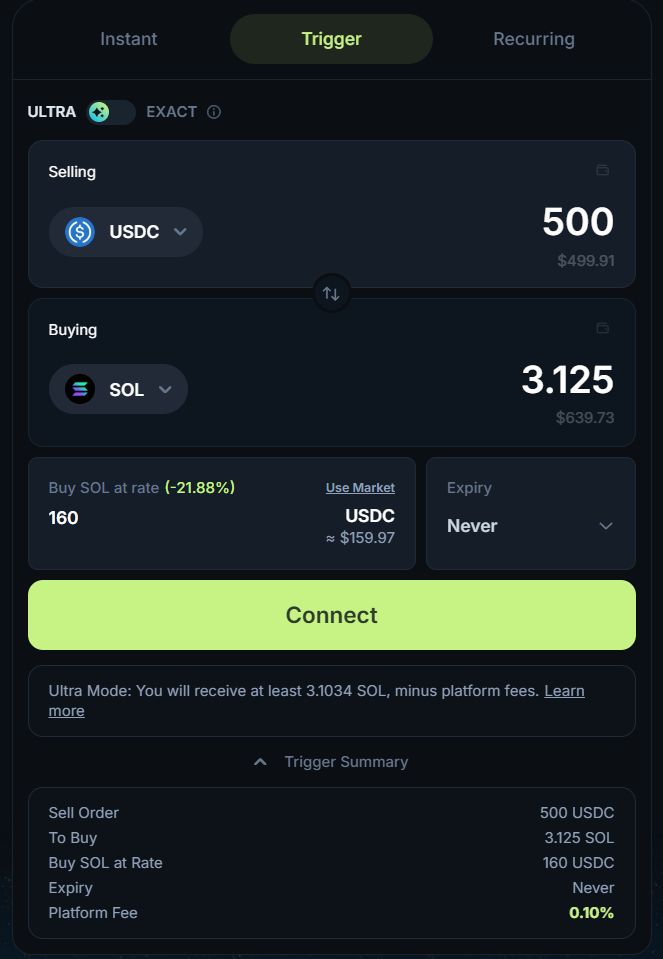
Now that we have established that you can't create limit orders on LPs, let's go to [Jupiter](https://jup.ag/trigger) and create limit orders on LPs.

<img src="https://raw.githubusercontent.com/jstEagle/Personal_Blog/main/posts/FusionAMM%20-%20The%20Gold%20Standard/Pasted%20image%2020250824121414.png" alt="" width="375">

Doesn't seem right, does it? It looks like a limit order. Quacks like a limit order. But is it actually a limit order? The short answer is: **"No"**. But that doesn't make for a good article. So let's dig deeper into what is actually happening.

<figure><img src="/files/7x9veSkRxorlFcW7FJ8H" alt=""><figcaption></figcaption></figure>

The first clue is the name, originally called "Trigger," now somewhat confusingly renamed "Limit". The way limit orders execute on LPs is by constantly watching the price. Once it hits the required level, a transaction is sent to execute the swap. The issue is, this is really inefficient. Imagine yourself in Jupiter's position: thousands of tokens, each one could have one or hundreds of pools. Thousands of users placing millions of orders on different pools at different prices. And every user expects to have their order filled at the price they requested. That creates immense cost for Jupiter. And the worst part is, fills aren't guaranteed. If your order isn't the fastest or isn't quick enough, you may not buy at the price you requested, or you might only buy a portion of the amount you wanted. Also consider other providers of limit orders. When everyone wants to be the first to get the best price, speed is vital, and more speed = more cost.

{% hint style="info" %}
There are on-chain order books and protocols that use order books. But these, in turn, lose the advantages of LPs.
{% endhint %}

### The Solution <a href="#the-solution" id="the-solution"></a>

Make the limit orders part of the liquidity. Simple. Efficient. Ingenious.

Fusion AMM does this by allowing users to place limit orders that the pool keeps track of between ticks. This means that in order for price to move past a level, all liquidity and limit orders on that level have to be consumed.

<figure><img src="/files/d9a7IaNGWhvtjMfK4yJv" alt=""><figcaption></figcaption></figure>

And if we flip the whole thing on its side and hide the core liquidity itself...

<figure><img src="/files/4xYZaQH7u2uZfs73OIgq" alt=""><figcaption></figcaption></figure>

By managing orders in this way we get a bunch of benefits:

* Orders are executed faster,
* Orders are executed more accurately,
* Instead of paying a fee to place a limit order, you earn rewards for providing liquidity through your limit order once it’s filled,
* No risk of partial fills even though the price moved past the limit order.

This finally gives AMMs the final leg up on traditional order books.

### Conclusion <a href="#conclusion" id="conclusion"></a>

FusionAMM isn’t about reinventing the wheel—it’s about putting better tires on the one we’ve been using for years. By collapsing liquidity and limit orders into the same pool, execution becomes smoother, cheaper, and far more intuitive for both traders and protocols.

**After all, the best innovations are the ones that make you wonder:&#x20;*****"Why weren’t we doing this the whole time?"***

*Written by* [*jstEagle*](https://www.jsteagle.dev/)


# Onboarding

{% content-ref url="/pages/nfj50zpiVF7qQF6YC60z" %}
[How to Do a Swap](/dive-into-defituna/trade/onboarding/how-to-do-a-swap)
{% endcontent-ref %}

{% content-ref url="/pages/fX5wykYDtLtlPLGoMtcS" %}
[How to Set Up a Limit Order](/dive-into-defituna/trade/onboarding/how-to-set-up-a-limit-order)
{% endcontent-ref %}

{% content-ref url="/pages/lnOVvTIRWWBipqAJJNIS" %}
[How to Open a Leveraged Spot Position](/dive-into-defituna/trade/onboarding/how-to-open-a-leveraged-spot-position)
{% endcontent-ref %}

{% content-ref url="/pages/nrjnV0zKY8xRWfTd0ztr" %}
[Monitoring Opened Leveraged Spot Positions](/dive-into-defituna/trade/onboarding/monitoring-opened-leveraged-spot-positions)
{% endcontent-ref %}


# How to Do a Swap

Navigate to our website: <https://defituna.com/trade>.\
Click the “**Connect wallet**” button — a purple icon located at the top of the page — and follow the steps to connect the wallet you'd like to use.

Once connected, open the dropdown menu to select your desired trading pair.\
Choose the appropriate pair, then select the **“Market”** tab. From there, you can choose whether you want to buy or sell. Make sure to disable leverage as well.

Next, specify the amount you want to swap. You can either enter a specific amount manually or select a percentage of your wallet balance. You can choose to input either the amount you want to pay or the amount you want to receive.

{% hint style="info" %}
**"Fees"** (left) indicate the amount you’ll pay to execute the swap.

**"Price impact"** refers to the change in price caused by the size of your trade.

**"Slippage"** is the maximum acceptable price deviation. You can change this value by clicking the dropdown and selecting one of the preset options or entering a custom value.
{% endhint %}

On the left side of the screen, you’ll also find the price chart, powered by the TradingView tool suite, along with the **Order Book** and the **Trades** executed within the pool.


# How to Set Up a Limit Order

Navigate to our website: <https://defituna.com/trade>.\
Click the **“Connect wallet”** button — a purple icon located at the top of the page — and follow the steps to connect the wallet you'd like to use.

Once connected, open the dropdown menu to select your desired trading pair.\
Choose the appropriate pair, then select the **“Limit”** tab. From there, you can choose whether you want to buy or sell.

Next, specify the price at which you want to place the order. You can either enter a specific price manually, choose the current market price, or select a percentage relative to the market price.\
Then, specify the amount you want to swap. You can either enter a specific amount manually or select a percentage of your wallet balance. You may choose to input either the amount you want to pay or the amount you want to receive.

Once you're ready, click “Buy SOL” or “Sell SOL” (depending on your trade direction and on the pair). A wallet popup will appear — confirm the transaction to place your limit order.

{% hint style="info" %}
**"Fees"** (right) indicates the amount you’ll be paid once your limit order is filled. Indeed, a negative value means you earn a rebate.
{% endhint %}

{% hint style="danger" %}
When placing a limit order on FusionAMM, you'll receive an NFT/SPL token representing your order. Do not transfer it to another wallet or burn it.
{% endhint %}

After your order is processed, it will appear in your **"Open Orders"** dashboard, where you can monitor its status and close the order once it is filled or manually at any point before.


# How to Open a Leveraged Spot Position

Navigate to our website: <https://defituna.com/trade>.\
Click the **“Connect wallet”** button — a purple icon located at the top of the page — and follow the steps to connect the wallet you'd like to use.

Once connected, open the dropdown menu to select your desired trading pair.\
Choose the appropriate pair, then select the **“Market”** tab. From there, you can choose whether you want to buy or sell. Enable and choose your leverage by selecting one of the presets or by entering a custom value.

{% hint style="info" %}
You can choose to **Swap through Jupiter**, which we recommend for better execution when opening your position.
{% endhint %}

You’re also able to set up a Take Profit and a Stop Loss, which will trigger to close your position at a specific price.

Once you're ready, click “Buy SOL” or “Sell SOL” (depending on your trade direction and on the pair). A wallet popup will appear — confirm the transaction to open your leveraged spot position.

{% hint style="info" %}
**"Margin"** refers to the initial deposit of funds from your wallet.

**"Fees"** indicate the protocol fees as well as the refundable fee.

**"Est. Liquidation"** is the price at which your position will be liquidated, as your Loan-to-Value ratio (LTV) has exceeded the allowed maintenance level.

**"Price Impact"** refers to the change in price caused by the size of your trade.

**"Funding"** displays the interest rate and interest cost for keeping leverage open for 24 hours. You can check the annualized funding by hovering over the tooltip.

**"Slippage"** is the maximum acceptable price deviation. You can change this value by clicking the dropdown and selecting one of the preset options or entering a custom value.
{% endhint %}

Once the transaction is processed, it will appear in your **“Positions”** dashboard, where you can monitor its status, edit your Take Profit and Stop Loss, and close the order at any point before your TP/SL triggers.

{% hint style="success" %}
If your position reaches the Take Profit, Stop Loss, or Liquidation price, the funds will be returned directly to your wallet.
{% endhint %}


# Monitoring Opened Leveraged Spot Positions

Once on the **Trade** page, you will see a section at the bottom called **Positions**. You must be logged in with the wallet that opened the initial position to view it.

By clicking on any active position, you can display the chart along with the entry price, liquidation price, and any TP/SL levels directly on the graph.

You can edit your position directly from the dashboard using the following icons:

1. [**TP/SL**](/dive-into-defituna/provide-liquidity/platform-info/trigger-orders) – Set a target price to automatically close your position. When triggered, you'll receive back the token you originally deposited as collateral.
2. **Close** – Fully close your position. On the panel that appears, you can also reduce your position size by moving the slider below 100%. \
   "*Withdraw*" indicates the amount you'll remove from your position. \
   "*Price Impact*" refers to the price change caused by your trade size. \
   "*Slippage*" is the maximum acceptable price deviation, which you can adjust by clicking the dropdown and selecting a preset or entering a custom value. \
   "*Swapping through Jupiter"* is recommended for better execution, but only if it reduces your estimated price impact.

<figure><img src="/files/PaJ1rQ1S1UUW0DSqNgXI" alt=""><figcaption></figcaption></figure>

{% hint style="info" %}
**"Pair"** displays the selected token pair, along with the current leverage and the pool provider's logo.

**"Size"** is the notional value of the position, calculated as *Margin + Borrowed Funds*.

**"Margin"** indicates the value of your current position, excluding leverage, and funding.

**"Margin (Initial)"** is the value of your initial deposit. Click the “T” button to view the breakdown by token.

**"Funding"** is the borrowing fee paid to the lending vault.

**"Liq Price"** indicates the price at which your position may be liquidated.&#x20;

**"Price / Entry"** shows the current pool price and the price at which you opened the position.

**"TP / SL"** displays your *Take Profit Trigger* and *Stop Loss Trigger* order prices, if set.

**"PnL"** displays the profit and loss of your position.\
*PnL = (Profit/Loss on your collateral) – Funding – Protocol Fees.*

**"Time"** shows the timestamp when the position was created, along with how much time has passed since then.

**"Address"** links to the Solscan SPL token address, showing all events related to this leveraged spot position.
{% endhint %}

To choose which columns to display on your **Positions** dashboard, click here and tick the relevant boxes. You can also choose to enable all.\
![](/files/t4kZ8gsMhvKEWuhxiVGY)

By clicking the “T” button, you can view all dashboard values broken down by token.

{% hint style="warning" %}
If you wish to increase your position while keeping the same leverage, simply open a new position with the same leverage as your current one.

Currently, you cannot repay your debt directly to reduce leverage. However, you can open a new position with leverage set to 1x, which adds margin without adding borrowed funds — effectively reducing your overall leverage.
{% endhint %}


# Platform Info

{% content-ref url="/pages/jWXmm3OZAhpWmlOIt1Ru" %}
[Supported Pools](/dive-into-defituna/trade/platform-info/supported-pools)
{% endcontent-ref %}

{% content-ref url="/pages/O2icGuTBEAtmxipchv5Z" %}
[Trade History](/dive-into-defituna/trade/platform-info/trade-history)
{% endcontent-ref %}

{% content-ref url="/pages/ycbhop5cQZiaf83U2dDN" %}
[Order History](/dive-into-defituna/trade/platform-info/order-history)
{% endcontent-ref %}

{% content-ref url="/pages/qXv1fURmDY2LovKfj063" %}
[Liquidations](/dive-into-defituna/trade/platform-info/liquidations)
{% endcontent-ref %}

{% content-ref url="/pages/jTDPpVt1CHd8uyqg57dE" %}
[Fees](/dive-into-defituna/trade/platform-info/fees)
{% endcontent-ref %}


# Supported Pools

All supported pools are accessible via the dropdown menu at the top of the page.

<figure><img src="/files/W3qsnzHOInh38mh7n2fU" alt=""><figcaption></figcaption></figure>

You can filter markets by toggling between **Main** markets (officially opened and supported by the DeFiTuna team), **Isolated** markets (user-created pools), and your **Favourites** (marked with the star icon).

{% hint style="info" %}
You can also view the supported pools under the Spot tab here: [https://defituna.com](https://defituna.com/).
{% endhint %}


# Trade History

By clicking on **“Trade History”,** you can view all your executed trades.

{% hint style="warning" %}
**Trade History** focuses only on executed trades while **Order History** records every action you take.
{% endhint %}

You can choose to display executed orders only for the currently displayed pool, and you can also filter them by **Direction** and by trade **Type**.

{% hint style="info" %}
“**Time**” indicates the exact date of the trade event.

“**Pair**” displays the selected token pair.

“**Direction**” indicates whether the trade was a Buy, a Sell, an Open Long, an Open Short, a Close Long, or a Close Short.

“**Size**” is the notional value of the trade expressed in the base token, along with its $ value at that time.

“**Order Value**” is the notional value of the trade expressed in the quote token, along with its $ value at that time.

“**Price**” is the price at which the trade occurred.

“**Closed PnL**” refers to the final PnL of your trade.

“**Fee**” indicates the total amount of fees paid to execute the trade and/or to keep it open. Negative fees are rebates.

You can also click on the icon in the last column to display the transaction on Solscan.
{% endhint %}

To choose which columns to display on your **"Trade History"** dashboard, click here and tick the relevant boxes. You can also choose to enable all.

<figure><img src="/files/v9T0aotwDodxptTeoX0F" alt=""><figcaption></figcaption></figure>


# Order History

By clicking on **“Order History”**, you can view all your orders.

{% hint style="warning" %}
**Order History** records every action you take, while **Trade History** focuses only on executed trades.\
Therefore, every order displayed in **Trade History** is included in **Order History**.
{% endhint %}

You can choose to display orders only for the currently displayed pool, and you can also filter them by **Direction** and by order **Type**.

{% hint style="info" %}
“**Time**” indicates the exact date of the order event.

“**Pair**” displays the selected token pair.

“**Direction**” indicates whether the order was a Buy, a Sell, a Long, or a Short.

“**Type**” indicates whether the order was a Market Order, Limit Order, Stop Loss, Take Profit, or Liquidation.

“**Size**” is the notional value of the order expressed in the base token, along with its $ value at that time.

“**Filled Size**” shows the number of tokens filled out of the total size of your order.

“**Order Value**” is the notional value of the order expressed in the quote token, along with its $ value at that time.

“**Price**” is the price at which the order occurred.

“**Avg Price**” is the average price at which the order was processed.

“**Status**” indicates whether the order has been Filled, Claimed, or Cancelled.

You can also click on the icon in the last column to display the transaction on Solscan.
{% endhint %}

To choose which columns to display on your **"Order History"** dashboard, click here and tick the relevant boxes. You can also choose to enable all.

<figure><img src="/files/v9T0aotwDodxptTeoX0F" alt=""><figcaption></figcaption></figure>


# Liquidations

A liquidation occurs when your Loan-to-Value ratio (LTV) exceeds the allowed maintenance margin threshold. This happens when the market moves against your position to the point where your margin no longer sufficiently covers your borrowed amount.

If your LTV is greater than or equal to the liquidation threshold, your position becomes eligible for liquidation. At that point, DefiTuna (acting as the liquidator) can trigger the liquidation process by calling the liquidation function. When this happens, your position is forcefully closed.

{% hint style="warning" %}
Consider the following scenario :&#x20;

* Notional value: $120
* Your position is liquidated via Fusion AMM.
* Liquidation Fee: 10% of the remaining funds after debt repayment.\
  In this case: 10% of $120 = $12 goes to DefiTuna, as the liquidator.
* The debt is repaid to the Lending Pool.
* Any remaining funds after fees and debt repayment are returned to you.
  {% endhint %}

{% hint style="danger" %}
Liquidations may not be instantaneous. Execution speed depends on Solana network congestion and system activity.
{% endhint %}

#### **Partial Liquidation**&#x20;

To improve execution and reduce slippage — especially on low-liquidity tokens or for large position sizes — DefiTuna supports partial liquidations:

If a full liquidation fails, the system will attempt to close the position in smaller portions:

* First 50%
* Then 25%
* And so on...&#x20;

This staged approach increases the chances of a successful liquidation while minimizing market impact.

{% hint style="info" %}
Liquidations are processed via **Jupiter** to improve execution and minimize price impact on the pool.
{% endhint %}


# Fees

### **Protocol Fees:**&#x20;

To support the growth of the protocol’s TVL, DefiTuna currently does not charge any fees to lenders.\
Instead, protocol fees are charged to users who open Leveraged Spot positions, as a one-time fee applied when the position is opened or closed.\
Fees vary by market and can be viewed in the [**Trade**](https://defituna.com/trade) tab at the top of the page, next to the pool statistics, by hovering over the **Protocol Fee** toggle.

<figure><img src="/files/IzeEB3KSffkOetHCmduA" alt=""><figcaption></figcaption></figure>

The fee structure consists of four components:

* **Collateral fee**: Applied to your collateral, i.e., the funds you have deposited. Currently, this fee is 0% on DefiTuna pools.
* **Borrowed funds fee**: Applied to the funds you borrow as leverage.
* **TP/SL trigger order fee**: Charged per successful trigger order. This is a one-time fee applied to the notional value of the position when the TP/SL is executed.
* [**Liquidation**](/dive-into-defituna/trade/platform-info/liquidations) **fee**: In the event of liquidation, a 10% fee is applied to the notional value of the position. This fee is paid to the liquidator who carries out the liquidation.


# Provide Liquidity

{% content-ref url="/pages/WwbM9CFjP1w8zEpMEJGu" %}
[Onboarding](/dive-into-defituna/provide-liquidity/onboarding)
{% endcontent-ref %}

{% content-ref url="/pages/U8TgIE9hrolxPpmn1cvT" %}
[Platform Info](/dive-into-defituna/provide-liquidity/platform-info)
{% endcontent-ref %}


# Onboarding

{% content-ref url="/pages/qM86HhhvxjbuSY2KO5Ks" %}
[How to Open a LP Position](/dive-into-defituna/provide-liquidity/onboarding/how-to-open-a-lp-position)
{% endcontent-ref %}

{% content-ref url="/pages/KRQ9EjFVbk1XewcYcmYO" %}
[Monitoring Opened LP Positions](/dive-into-defituna/provide-liquidity/onboarding/monitoring-opened-lp-positions)
{% endcontent-ref %}


# How to Open a LP Position

1. Navigate to our website: [https://defituna.com](https://defituna.com/). By default, you will land on the **Markets** section.
2. Click the **Connect Wallet** button (the purple icon at the top of the page) and follow the prompts to connect the wallet you’d like to use.
3. Once connected, go to the **Liquidity Provision** tab. There, you’ll find a table of all available pools. Select your desired trading pair by clicking on it.
4. You’ll then be redirected to the **Provide Liquidity** section, where you can fully set up your position in the following order:

### Position

{% hint style="info" %}
You can choose whether or not to use **Leverage** on your LP position by using the dropdown. You can also enter a custom value, which will display a slider allowing you to set or input your leverage.

**"Disable Swap"** determines whether you can deposit a single asset as collateral—if disabled, DefiTuna will automatically swap the necessary amount to reach the target deposit ratio; if enabled, your deposit must already match the required ratio.

**"Full-Range"** when enabled, allows you to provide liquidity across the entire price range.

**"Lock"** when enabled, permanently locks your position in the protocol. To access this feature, you must first enable **Allow Position Locking** in your Settings.

**"Borrow Ratio"** allows you, when leverage is enabled, to choose the combination at which your borrowing will occur. In general, the asset you borrow is the one you end up shorting. You’ll also notice that your Borrow Ratio directly influences your **PnL chart,** which you can enable by toggling the PnL button in the upper right corner of the chart.

**"**[**Lower / Upper Trigger**](/dive-into-defituna/provide-liquidity/platform-info/trigger-orders)**"**, when enabled, allows you to close your LP position at a specific price and also enables you to swap your position into the desired token.

**"**[**Auto-Compounding**](/dive-into-defituna/provide-liquidity/platform-info/compound)**"**, when enabled, reinvests your yield back into your LP position. You can decide to "*Keep Leverage*" or to "*Reduce Leverage*".

**"Size"** indicates the notional value of your position in $, where Borrowed Funds + Margin = Position Size.

**"**[**Liq. Price**](/dive-into-defituna/provide-liquidity/platform-info/liquidations)**"** indicates the price points at which your position may be liquidated (lower and/or upper bounds). You may have one, two, or no liquidation points, depending on your setup.

**"Deposit Ratio"** is the distribution of your deposit across both sides of the pool from the current price.

**"Margin"** refers to the initial deposit of funds from your wallet.

**"**[**Fees**](/dive-into-defituna/provide-liquidity/platform-info/fees)**"** includes the protocol fee and a refundable fee.

**"Slippage"** is the maximum acceptable price deviation. You can change this value by clicking the dropdown and selecting one of the preset options or entering a custom value.
{% endhint %}

The interface provides three tools to help you build your position with confidence:

**Set your range directly on the chart**\
Rather than entering price boundaries manually, you can set your upper and lower range visually on the TradingView chart. This lets you see exactly where your position sits relative to the current price and recent price action.

{% embed url="<https://youtu.be/LbADpdYap8A>" %}

**Visualize liquidity depth at a glance**\
The liquidity depth view lets you see buy and sell pressure at any price level in real time. Understanding where liquidity is concentrated before deploying capital ensures you never enter a position blind.

{% embed url="<https://youtu.be/sZSeleYImhQ>" %}

**Forecast your PnL before committing**\
The built-in PnL chart models your expected returns based on your range, [yield](/dive-into-defituna/provide-liquidity/platform-info/yield-estimation), and current market conditions. Adjust your parameters and see the impact instantly — no surprises when you exit your LP.

{% embed url="<https://youtu.be/VCX6GNRe6e4>" %}

If you're happy with the setup you may proceed by pressing on **Create Position**.

{% hint style="info" %}
You can find a more in-depth guide [here](/learn-more/how-to-open-different-lp-strategies/position-opening).
{% endhint %}


# Monitoring Opened LP Positions

Once on the **Provide Liquidity** page, you will see a section at the bottom called **Positions**. You must be logged in with the wallet that opened the initial position to view it.

By clicking on any active position, you can display the chart along with up-to-date PnL and Liquidity visualizations, liquidation price(s), and any TP/SL levels directly on the graph.

You can edit your position directly from the dashboard using the following icons:

1. **Increase Position** – Add external funds as collateral while keeping your current leverage.&#x20;
2. **Repay Debt** – Reduce your leverage by adding external funds to repay borrowed assets. Reducing leverage pushes the liquidation points further apart.
3. [**Trigger Orders**](/dive-into-defituna/provide-liquidity/platform-info/trigger-orders) – Set a target price to automatically close your position and swap your collateral into your preferred token.
4. **Claim Yield** – Collect your accrued liquidity provision fees. You can also manually compound your yield, which adds those fees directly to your collateral, with or without leverage.
5. [**Auto-Compounding**](/dive-into-defituna/provide-liquidity/platform-info/compound) – Automatically reinvest your earnings as they accrue, whether you're using leverage or not.
6. **Close** – Fully close your position. On the panel that appears, you can also reduce your position size by moving the slider below 100%, and/or swap your position into your desired token.

<figure><img src="/files/H73mEd9nyRVRWHN2356V" alt=""><figcaption></figcaption></figure>

{% hint style="info" %}
**"Pair"** displays the selected token pair, along with the current leverage and the pool provider's logo.

**"Status"** indicates whether the position is *In Range*, *Out of Range*, *Closed*, or *Liquidated*.

**"Size"** is the notional value of the position, calculated as *Margin + Borrowed Funds*.

**"Margin"** indicates the value of your current position, excluding leverage, uncompounded yield, and funding.

**"Margin (Initial)"** is the value of your initial deposit. Click the “T” button to view the breakdown by token.

“**Funding**” is the borrowing fee paid to the lending vault.

**"**[**Liq Price**](/dive-into-defituna/provide-liquidity/platform-info/liquidations)**"** indicates the price points at which your position may be liquidated (lower and/or upper bounds). You may have one, two, or no liquidation points, depending on your setup.

**"Price / Entry"** shows the current pool price and the price at which you opened the position.

**"LT / UT"** displays your *Lower Trigger* and *Upper Trigger* order prices, if set.

**"Yield"** shows your pending yield, with compounded yield shown in brackets.

**"Price Range"** displays the selected range for your LP position.

**"PnL"** displays the profit and loss of your position.\
*PnL = (Profit/Loss on your collateral) + Yield – Funding – Protocol Fees.*\
You can generate a PnL card by clicking on the arrow.

**"Time"** shows the timestamp when the position was created, along with how much time has passed since then.

**"Address"** links to the Solscan SPL token address, showing all events related to this LP position.
{% endhint %}

To choose which columns to display on your **Positions** dashboard, click here and tick the relevant boxes. You can also choose to enable all.\
![](/files/t4kZ8gsMhvKEWuhxiVGY)

By clicking the “T” button, you can view all dashboard values broken down by token. For instance:

* If the “**T**” button is selected, **PnL** is shown relative to holding the token selected in the top-right corner of the PnL chart (e.g., “PnL in SOL”). You can click the arrow to switch to the other token in the pair.
* If the “**$**” button is selected, **PnL** is shown relative to holding USDC in your wallet.

You can also forecast your future profitability by simulating a specific "**Time in Range**" on the PnL chart. The simulation estimates your yield based on the selected time in range, minus any applicable borrowing fees.

<figure><img src="/files/UTKK3slZaocGyyJZOmSM" alt=""><figcaption></figcaption></figure>


# Platform Info

{% content-ref url="/pages/OG86G9rmg4kFNE1Adwjc" %}
[Supported Pools](/dive-into-defituna/provide-liquidity/platform-info/supported-pools)
{% endcontent-ref %}

{% content-ref url="/pages/HEVhOBlL6rgGBC8RKzgF" %}
[Trade History](/dive-into-defituna/provide-liquidity/platform-info/trade-history)
{% endcontent-ref %}

{% content-ref url="/pages/xJOvmHNx4sVN21oeJbjN" %}
[Yield Estimation](/dive-into-defituna/provide-liquidity/platform-info/yield-estimation)
{% endcontent-ref %}

{% content-ref url="/pages/jqruFV2RYCVxrLfY8M6j" %}
[Compound](/dive-into-defituna/provide-liquidity/platform-info/compound)
{% endcontent-ref %}

{% content-ref url="/pages/uUmbjyZU7tPDfG38rgGP" %}
[Trigger Orders](/dive-into-defituna/provide-liquidity/platform-info/trigger-orders)
{% endcontent-ref %}

{% content-ref url="/pages/CUDqFMAqnmsvpYiPcACu" %}
[Liquidations](/dive-into-defituna/provide-liquidity/platform-info/liquidations)
{% endcontent-ref %}

{% content-ref url="/pages/PYe4IGwL3FEeyQ7HQ5vs" %}
[Fees](/dive-into-defituna/provide-liquidity/platform-info/fees)
{% endcontent-ref %}

{% content-ref url="/pages/3pGEdZ8xPmezzc3UEDbw" %}
[Terminology](/dive-into-defituna/provide-liquidity/platform-info/terminology)
{% endcontent-ref %}


# Supported Pools

We currently support both **Orca pools** and **DefiTuna pools**, powered by Fusion AMM.\
You can view all supported pools [here](https://defituna.com/), under the **Liquidity Provision** tab.

* **Filter pools**: choose to display only DefiTuna pools, only Orca pools, or restrict the view to Main markets officially opened and supported by the DeFiTuna team.
* **Search pools**: use the search bar to find pools containing a specific token (e.g., SOL pools, USDC pools, etc.).
* **Sort pools**: click on a column header (e.g., TVL, Yield/TVL (24h)) to sort the list in ascending or descending order.

Once you’ve found the pool you want, simply click on it to open the **Provide Liquidity** section, where you can set up your position.

{% hint style="info" %}
You can also navigate directly to the [**Provide Liquidity**](https://defituna.com/lp) section and click on the dropdown menu to view all supported pools.
{% endhint %}


# Trade History

By clicking on **"Trade History"**, you can view all your past and current liquidity positions opened via DefiTuna.

You can choose to display positions for the currently selected pool only, and filter them by **Status**.

{% hint style="info" %}
**"Pair"** displays the selected token pair, along with the current leverage and the pool provider's logo.

**"Status"** indicates whether the position is Opened, Closed by Order, Closed, or Liquidated.

**"Size"** is the notional value of the position, calculated as Margin + Borrowed Funds.

**"Deposit/Withdraw"** indicates how much you've added as collateral to the pool and how much you've withdrawn, expressed in $.

**"Entry Price"** shows the price at which you opened the position.

**"Exit Price"** is the average price at which you closed your position.

**"Price Range"** displays the selected range for your LP position.

**"PnL"** displays the realized profit and loss of your position. \
PnL = (Profit/Loss on collateral) + Yield – Funding – Protocol Fees.

**"Yield"** shows your total claimed yield.

**"Protocol Fees"** is the total amount of fees paid to the protocol.

**"LT / UT"** displays your Lower Trigger and Upper Trigger order prices, if set.

**"Time Opened"** shows the timestamp when the position was opened, along with the elapsed time since then.

**"Time Closed"** shows the timestamp when the position was closed, along with the elapsed time since then.

**"Address"** links to the Solscan SPL token address, showing all events related to this LP position.
{% endhint %}

To choose which columns to display on your **"Trade History"** dashboard, click here and tick the relevant boxes. You can also choose to enable all.

<figure><img src="/files/v9T0aotwDodxptTeoX0F" alt=""><figcaption></figcaption></figure>

{% hint style="info" %}
By clicking on any position, you can view every action that occurred within your liquidity pool, as well as the total duration of the position.
{% endhint %}


# Yield Estimation

Projected yields are calculated based on data from the past 24 hours of trading within the selected price range.&#x20;

{% hint style="warning" %}
The projected yield is only an estimate based on trading data from the past 24 hours. It is not guaranteed, as both trading volume and yields are constantly fluctuating.
{% endhint %}

While other platforms might display 24-hour yield based on your collateral, DeFiTuna uses a similar methodology — with one key difference: we account for leverage, if any, in yield calculations.

This distinction is important. A 24-hour yield figure is inherently static. When you increase your collateral, the yield may appear smaller as a percentage of that collateral, even if the actual earnings haven’t changed. In contrast, using leverage amplifies your position size relative to your collateral, which means your yield as a percentage of collateral can increase significantly.

{% hint style="info" %}
Example : $100,000 Yield last 24 hours within selected range\
Collateral = $10,000\
Yield 24h = 10%\
\
If leverage is used (5x)\
Collateral = $10,000\
Total position size = $50,000\
Yield 24h = 50%
{% endhint %}

{% hint style="info" %}
The estimated 24h yield does not yet account for borrowing costs. This will be included in a future update.

For now, it can be done manually. You can find the 24-hour borrowing costs in the pool stats under **Funding Rate**.

Example:

* Yield 24h = 2%
* Funding Rate = 0.04% (for both Token A and Token B)
* Leverage = 5x

To calculate your net yield, multiply the interest rate by the leverage and subtract it from the displayed yield:

`2% - (0.04% × 4) = 1.84%`

**Note:** The interest is multiplied by 4 (not 5) because you already own 1x of your position; only the borrowed portion (4x) incurs interest.
{% endhint %}


# Compound

Open positions generate yield as swaps occur within your selected price range. Defituna offers users the ability to compound this yield directly into your position, allowing for greater capital efficiency. \
Users can choose between two compounding strategies:

<figure><img src="/files/ypDXXG1xlSOrbfzd7cx2" alt=""><figcaption></figcaption></figure>

#### **Keep Leverage**

* When selected, your yield is compounded along with additional borrowed funds, maintaining your leverage unchanged.
* This means your position scales proportionally, increasing both your exposure and potential returns while keeping liquidation price points at the same level.

#### **Reduce Leverage**&#x20;

* With this option, your accumulated yield is added to your position as additional margin, without increasing the borrowed amount.
* Since yield is treated as margin, this reduces your overall leverage, lowers liquidation risk, and pushes the liquidation price further away.&#x20;
* This strategy is ideal for users looking to de-risk while growing their position steadily over time.

## Auto-compounding

You can enable or disable auto-compounding in two ways:

* **During position opening:** Enable **“Auto-compounding”** and choose whether you want to keep or reduce leverage.
* **For an existing position:** Use the **“Auto-compounding”** icon on the dashboard as mentioned [here](/dive-into-defituna/provide-liquidity/onboarding/monitoring-opened-lp-positions).

<figure><img src="/files/IJSv1N5LLzLcf0GUeZP4" alt=""><figcaption></figcaption></figure>

{% hint style="warning" %}
The **minimum threshold** to trigger an auto-compounding event is ≈$16, including any borrowed funds. Auto-compounding is not guaranteed.
{% endhint %}


# Trigger Orders

{% hint style="danger" %}
During periods of high congestion on the Solana network, Trigger Orders may require multiple attempts to execute. \
Please note that execution is not guaranteed, as Solana remains in Beta and our systems are continuously being optimized to deliver the best possible user experience.
{% endhint %}

You can set Trigger Orders, which can function as Stop-Loss or Take-Profit orders, in two ways:

* During position opening: Enable **"Lower / Upper Triggers"**.
* For an existing position: Use the **“LT /** **UT”** icon on the dashboard as mentioned [here](/dive-into-defituna/provide-liquidity/onboarding/monitoring-opened-lp-positions).

A **Lower Trigger (LT)** places an order below the current price and helps to limit losses or secure gains by automatically closing your position once the price drops to or below the LT trigger. \
This trigger order is placed under the "LT" order.

A **Upper Trigger (UT)** places an order above the current price and helps to limit losses or secure gains by automatically closing your position once the price rises to or above the UT trigger. \
This trigger order is placed above the "UT" order.

<figure><img src="/files/1tDUu7FdkkT6I5dDytiz" alt=""><figcaption></figcaption></figure>

Above is an example on the SOL/USDC pair. The liquidation price is $74.26, and the lower trigger order is set at $75.00.\
This setup is considered risky during high volatility, as the price may quickly drop through both your limit order and the liquidation point, resulting in liquidation before the trigger order is executed.

{% hint style="danger" %}
**Best practice:** avoid placing trigger orders too close to your liquidation price. \
Execution is not guaranteed, and you may still be liquidated before the order is executed.
{% endhint %}

Once LT/UT order is created, it appears under the **"**[**Positions**](/dive-into-defituna/provide-liquidity/onboarding/monitoring-opened-lp-positions)**"** table. If not immediately visible, you may need to enable it via the column filter. You can adjust the trigger price from this table at any time. LT/UT orders trigger full position closure only (partial closures are not yet supported).

When a position is closed (manually or via LT/UT), all associated trigger orders are automatically cancelled. A fee on the notional value of the position is charged for any executed LT/UT order and can be found in the pool stats under **Protocol Fee**.

**Trigger Orders Swap**

To enhance risk management and provide users with greater flexibility, DefiTuna allows you to choose which token your position will be swapped into when a trigger order is executed.\
This feature ensures a predictable and customizable outcome, matching your desired risk profile.

<figure><img src="/files/GvXVGQsQrH58f9FuLSEa" alt="" width="527"><figcaption></figcaption></figure>

{% hint style="info" %}
Trigger orders are processed via **Jupiter** to improve execution and minimize price impact on the pool.
{% endhint %}


# Liquidations

A liquidation occurs when your Loan-to-Value ratio (LTV) exceeds the allowed maintenance margin threshold. This happens when the market moves against your position to the point where your margin no longer sufficiently covers your borrowed amount.

If your LTV is greater than or equal to the liquidation threshold, your position becomes eligible for liquidation. At that point, DefiTuna (acting as the liquidator) can trigger the liquidation process by calling the liquidation function. When this happens, your position is forcefully closed.

{% hint style="warning" %}
Consider the following scenario :&#x20;

* Notional value: $120
* Your position is liquidated via Orca or Fusion AMM.
* Liquidation Fee: 10% of the remaining funds after debt repayment.\
  In this case: 10% of $120 = $12 goes to DefiTuna, as the liquidator.
* The debt is repaid to the Lending Pool.
* Any remaining funds after fees and debt repayment are returned to you.
  {% endhint %}

{% hint style="danger" %}
Liquidations may not be instantaneous. Execution speed depends on Solana network congestion and system activity.
{% endhint %}

#### **Partial Liquidation**&#x20;

To improve execution and reduce slippage — especially on low-liquidity pools or for large position sizes — DefiTuna supports partial liquidations:

If a full liquidation fails, the system will attempt to close the position in smaller portions:

* First 50%
* Then 25%
* And so on...&#x20;

This staged approach increases the chances of a successful liquidation while minimizing market impact.

{% hint style="info" %}
Liquidations are processed via **Jupiter** to improve execution and minimize price impact on the pool.
{% endhint %}


# Fees

### **Protocol Fees:**&#x20;

To support the growth of the protocol’s TVL, DefiTuna currently does not charge any fees to lenders.\
Instead, protocol fees are charged to users who open Liquidity Provision (LP) positions, as a one-time fee applied when the position is opened or closed.\
Fees vary by pool and can be viewed in the [**Provide Liquidity**](https://defituna.com/lp) tab at the top of the page, next to the pool statistics, by hovering over the **Protocol Fee** toggle.

<figure><img src="/files/tsIxIMWEWMD7w1QgRa9o" alt=""><figcaption></figcaption></figure>

The fee structure consists of four components:

* **Collateral fee**: Applied to your collateral, i.e., the funds you have deposited. Currently, this fee is 0% on DefiTuna pools and remains minor on Orca pools.
* **Borrowed funds fee**: Applied to the funds you borrow as leverage.
* **Lower/Upper** [**trigger order**](/dive-into-defituna/provide-liquidity/platform-info/trigger-orders) **fee**: Charged per successful trigger order. This is a one-time fee applied to the notional value of the position when the trigger order is executed.
* [**Liquidation**](/dive-into-defituna/provide-liquidity/platform-info/liquidations) **fee**: In the event of liquidation, a 10% fee is applied to the notional value of the position, including any unclaimed fees. This fee is paid to the liquidator who carries out the liquidation.

### **Opening a Position Fee**

DefiTuna charges a **refundable** deposit when opening a position. This amount is returned upon closing the position. The amount of the refundable fee is about **0.02 SOL**.

### [**Compound**](/dive-into-defituna/provide-liquidity/platform-info/compound) **Fee**

The fee structure follows the same model as the Protocol Fees. \
Therefore, fees depend on the pool you're compounding into.\
\
**Example 1 — Reduce leverage:**\
You are compounding $1,000 of yield into an open DefiTuna SOL/USDC liquidity pool position.\
Protocol fee for this pool is 0% on margin and 0.05% on borrowed funds.\
$$1000 \* 0.00 =$0$$ \
Total fee = $0\
\
**Example 2 — Keep leverage:**\
You are compounding $1000 of yield, along with $2000 of borrowed tokens, back into the same SOL/USDC pool.\
With a 3x leverage, the total amount is $3000.\
$$ $1000 + $2000 $$  \
$$1000 \* 0.00 =$0$$   \
$$2000 \* 0.0005 = $1$$  \
Total fee = $1.00


# Terminology

**Margin:** The initial deposit made from your wallet. This is the capital against which leverage can be taken.

**Leverage:** Borrowed funds used to amplify your liquidity position. These funds are sourced from lending pools and increase your exposure to market movements.

**Borrow Ratio:** Represents the composition of borrowed tokens within your leveraged position. \
By adjusting this ratio, user can change their exposure to the market. \
For example, if a user borrows SOL, they will need to repay in SOL upon closing the position. If the market price of SOL decreases, the user can repurchase it at a lower price, thus profiting from the difference.&#x20;

**Size:** The total value of your position, calculated as: Margin + Borrowed Tokens.

**Swap:** The amount of tokens that will be exchanged in order to open the position. This value depends on your Borrow Ratio and Leverage settings.\
Once selected, DefiTuna calculates how many tokens need to be swapped to match the target deposit ratio for the chosen CLMM range. \
The swap amount is primarily influenced by the selected liquidity range and the composition of your borrowed tokens.

**Liquidation price:** The market price at which your position will be forcefully closed.\
At this point, all borrowed funds will be automatically returned to lenders to avoid bad debt.&#x20;

**Pair:** The token pair (e.g., SOL/USDC) in which liquidity is provided.

**Debt:** The total amount of borrowed tokens used as leverage in your position.

**Yield:** The fees earned in tokens as a result of providing liquidity within the selected range.

**APR (Annual Percentage Rate)** refers to the annualized interest rate charged when borrowing funds, excluding the effect of compounding, whereas **APY (Annual Percentage Yield)** represents the effective annual return, including the effect of compounding and showing how your earnings grow over time as interest is reinvested.


# Lend

{% content-ref url="/pages/iZrgWm2RtGmrQauwyOv7" %}
[How to Lend](/dive-into-defituna/lend/how-to-lend)
{% endcontent-ref %}

{% content-ref url="/pages/n2UewIM778UDkdutEuIv" %}
[Supply APR and Utilization](/dive-into-defituna/lend/supply-apr-and-utilization)
{% endcontent-ref %}


# How to Lend

**How do I lend on DeFiTuna?**

1. Navigate to <https://defituna.com/lend>.
2. Connect the wallet you wish to use by following the connection process.
3. Select the **Main** tab (see more about the **Isolated** tab below).
4. Select the token you want to lend and click “**Deposit**”.
5. Enter the amount you’d like to lend, then click “**Deposit**" and go through the confirmation process using your wallet.

{% hint style="info" %}
**"Pool"** indicates the token type that the relevant pool supports.

**"Supply"** indicates how much AUM is currently locked in the pool.

**"Borrowed"** indicates how much of the supply is being actively used as Leverage.

**"Utilization"** is representing the relation between **Borrowed** funds in percentage to the **Supply**. If the supply is 100 USDC and 10 USDC is currently being borrowed, utilization is 10%.

**"Supply APY"** indicates the annualized interest paid to the Lending pool.

**"Supply Limit"** refers to the maximum amount that can be supplied. These limits can be increased if necessary.
{% endhint %}

Once you've set up your Lending position you can see it live under "**My Lendings**".&#x20;

{% hint style="info" %}
**Note:** Lending auto-compounds your earnings. You do not need to claim them.&#x20;
{% endhint %}

You can always modify your Lending position by either selecting to "**Withdraw**" funds (either partially or fully) or "**Deposit**" in order to increase the amount you're willing to lend.

{% hint style="warning" %}
You can also lend your tokens on **Isolated** markets, meaning your tokens will only be lent to users of the specific market you've chosen.

This prevents risk contagion in the event of bad debt across lending pools.
{% endhint %}


# Supply APR and Utilization

## Supply APR Formula

To determine the supply APR we use the following formula :&#x20;

$$
sr(U) = r(U) \cdot U \cdot (1 - \text{fee})
$$

Where:

* fee = Lending protocol fee is $$0$$ as our protocol pays everything directly to the Lenders.
* r(U) = borrow APR
* U = current utilization

## Utilization-Based Interest Rate Model

DefiTuna utilizes a curve-based interest rate model to dynamically adjust Annual Percentage Rates (APR) in response to changes in utilization rates. This approach ensures efficient and balanced operation under varying market conditions.

Our interest rate model targets a utilization rate $$U$$ of **90%**. Utilization curve function scales the target APR depending upon the relationship between utilization and APR and is governed by the following formula (r(U) = borrow APR):

&#x20;                                                        $$r(U)=r\_{90%}⋅curve(U)$$

$$
\text{curve}(U) =\begin{cases}
1+\frac{(U - U\_t) \cdot (k\_d - 1)}{1 - U\_t}, & \text{if } U > U\_t \\
1 - \frac{(U\_t - U) \cdot (k\_d - 1)}{k\_d \cdot U\_t}, & \text{if } U \leq U\_t
\end{cases}
$$

Where:

* $$k\_d$$ = $$4.0$$
* $$U\_t = 0.9$$  (90%)

Behavior of the Model

* At $$U$$ = $$90%$$, $$r(U)$$ = $$r\_{90%}$$.
* At $$U$$ = $$100%$$, $$r(U)=4·r\_{90%}$$.

<figure><img src="/files/0WJQp70d0svIKXcq3jrm" alt=""><figcaption><p>Here, r<sub>90%</sub> = 0.25 (e.g. SOL supply APY curve)</p></figcaption></figure>

From 90% to 100% utilization, the supply (and thus borrow) APR increases exponentially. This mechanism is designed to incentivize borrowers to repay their loans and encourage lenders to deposit more funds, preventing the utilization rate from ever reaching 100%.\
This ensures that lenders can withdraw their funds at any time and borrowers can still open LP positions when needed.

{% hint style="info" %}
Currently, our target Lending APR for most assets is 36% at the optimal utilization point (90%). However, this target APR may vary depending on the asset.

For example, at 90% utilization, SOL lending would result in a lending APR of 25%, while USDC would be at 30%.
{% endhint %}

{% hint style="warning" %}
For a given token (such as USDC or SOL) and at equal utilization, isolated lending pools may offer a higher supply APY than the Main pool. This reflects the additional risk taken on by lenders, as isolated markets and their underlying tokens are generally considered riskier.
{% endhint %}


# Settings

## Reset Trading Layout

Since the Trading Layout is fully customizable, you may accidentally delete a panel or simply want to restore the default layout. This can be done at any time by clearing your browser data or manually from the Settings.

## Transaction Priority Fee

DefiTuna is built on top of the Solana network as a Defi protocol. As such, any interaction with our platform, including lending pool activity and opening/closing positions, requires direct communication with Solana validators.&#x20;

Under normal conditions, our default fee settings are sufficient for smooth operation. However, during periods of high network congestion, you may need to apply higher priority fees to ensure your transactions are processed in a timely manner.

In the navigation bar, click the cog icon. Under **Priority Fee**, select either one of our pre-set options (e.g., Auto) or define a custom fee.

* Selecting "**Auto**" allows the protocol to apply a fee above average based on current network activity.
* For greater reliability during congestion, you can boost fees up to **5x** or **10x** the average cost.
* To avoid overpaying, we've implemented a **Max Fee Cap**. This feature protects users from accidentally setting fees that are too high.

Don't forget to lower your fee settings once congestion eases!

## Change RPC

We currently support **Triton**, **Helius** and **Custom** RPCs (Remote Procedure Calls).

To ensure smooth interaction with DeFiTuna, we recommend selecting the RPC endpoint with the lowest response time (in milliseconds). This will help reduce latency and improve the overall responsiveness of your experience.

To change the RPC, click the cog icon in the navigation bar, then open the dropdown under **RPC**, select your preferred RPC or enter your custom RPC, and click **Save Changes**.


# FAQ

{% content-ref url="/pages/PybRkfuw1u4Hx3PiGztx" %}
[Trade FAQ](/learn-more/faq/trade-faq)
{% endcontent-ref %}

{% content-ref url="/pages/yBmoyiX1lpEn86lCwDTn" %}
[Provide Liquidity FAQ](/learn-more/faq/provide-liquidity-faq)
{% endcontent-ref %}

{% content-ref url="/pages/Z7jLDjVAksUoNUUEGYcu" %}
[Lend FAQ](/learn-more/faq/lend-faq)
{% endcontent-ref %}


# Trade FAQ

#### 1) **My limit order got filled but I did not receive SOL. Instead, I received an SPL token. How can I get my SOL?**

When you place a limit order on DefiTuna, you receive an SPL token that represents your order. To claim your SOL, you need to close the order, which will automatically burn the associated SPL token and return your funds.

{% hint style="danger" %}
Do not burn the SPL token manually — this will make your order unrecoverable.
{% endhint %}

You can also close the order at any time before it is fully or partially filled to reclaim your initial deposit.

<figure><img src="/files/HDU0Il7A94USgsMBuLRH" alt=""><figcaption></figcaption></figure>

#### **2) I moved the SPL token to another wallet. How can I claim my SOL now?**

We strongly recommend not interacting directly with the SPL token received when opening limit orders.  In theory, transferring this token gives the new wallet the ability to close the associated limit order and claim the funds. \
However, this scenario is not currently supported by the UI and is not the intended use case.

#### **3) My limit order has been filled but I did not receive the rebate. How do I claim it?**

The rebate is automatically included in your claimable amount and cannot be claimed separately. When closing your limit order, the rebate is paid out on top of the filled token amount.

#### **4) How can I add size to my leveraged spot position?**

To increase your position while keeping the same leverage, simply open a new position with the same leverage as your current one using the main form.


# Provide Liquidity FAQ

#### **1) I have a leveraged LP. Why is my collateral decreasing even though the price is going up?**

With a leveraged LP, your exposure to price movements depends on which tokens you are borrowing. Generally speaking, you end up shorting the token you borrow the most and, as a result, longing the token you borrow the least. This effect is especially pronounced at high leverage.

As a result, if the price of the token you are borrowing rises significantly, the value of your debt increases faster than your collateral, leading to a reduction in your profit.

This is visible on the PnL chart at the top of the page.

<figure><img src="/files/vo6qwnsFuvnnP5rebwGh" alt=""><figcaption></figcaption></figure>

In this example, the PnL chart shows that starting at $91.07, your collateral's profit begins to decrease.

#### **2) My position had a balanced borrow mix, the price moved out of my range and I'm experiencing a loss. Why?**

You've realized your impermanent loss. When borrowing a balanced mix of both tokens, your goal is to close the position as close as possible to your entry price, especially if the position was opened at the midpoint of your range: you're essentially shorting volatility.

The PnL chart highlights that the maximum loss within the range occurs at the edges. Once the price moves outside your range, you're no longer earning swap fees, meaning there's no yield to offset the impermanent loss.

Therefore, if the swap fees generated don't outweigh the impermanent loss, you end up with a net loss when you exit the position.

<figure><img src="/files/lmVAo1vX1griktGc0o7i" alt=""><figcaption></figcaption></figure>

Further information on the "Neutral" Farming strategy can be found [here](/learn-more/how-to-open-different-lp-strategies/neutral-farming).

#### **3) Despite borrowing 100% USDC, effectively longing the paired token, my potential upside profit seems very small. Why is that?**

Borrowing 100% USDC means you are shorting USDC and therefore longing the paired token. However, even with this setup, your upside can appear limited if your range is poorly positioned.

For this to work effectively, your initial deposit should be primarily composed of the token you are long on. This ensures that as its price increases, your position gradually converts it into USDC, effectively locking in gains as the price rises.

If your range is too wide or if your lower range bound is positioned too far below your entry price, your position may start off with too much USDC, limiting your exposure to the upside. For an optimal setup, position your lower bound close to your entry price while leaving room above for price appreciation.

<figure><img src="/files/80x9zc3VakbGmeUKdTnE" alt=""><figcaption></figcaption></figure>

Further information on the "Long" Farming strategy can be found [here](/learn-more/how-to-open-different-lp-strategies/long-farming).

#### **4) My PnL shows a profit, but when I try to withdraw, I end up with less SOL than I initially deposited. Why?**

By default, PnL is shown in USD ($), meaning it reflects your performance relative to holding USDC in your wallet.

By clicking the “T” button, you can switch the PnL display to reflect performance in tokens, based on the token selected in the top header of the PnL chart (e.g., “PnL in SOL”). You can click on it to switch to the other token in the pair.

<figure><img src="/files/D6jkYkBWTcyZNjQ9sPIg" alt=""><figcaption></figcaption></figure>

Example:

* You deposited 10 SOL when the price was $160 → total value = $1,600
* The price of SOL rises to $180, and your liquidity position is now worth $1,710
* In USD terms: $1,710 - $1,600 = $110, so your PnL in USD is +$110
* However, in SOL terms: $1,710 / $180 = 9.5 SOL, meaning you now hold 0.5 SOL less
* So your PnL in SOL is -0.5 SOL

Therefore, always refer to the PnL chart and select the appropriate view (base token or quote token) to understand your performance in the unit that matters to you.


# Lend FAQ

#### 1) **How can I withdraw my yield?**

Because lending auto-compounds your earnings, your yield is automatically added to your deposit. \
To claim it, click on 'Withdraw' and enter the amount of the yield you've earned.

<figure><img src="/files/YkPBrUMmQZ1QGq0GF5du" alt=""><figcaption></figcaption></figure>

#### **2) Why is the yield displayed in USD?**

By default, lending displays the USD value of your deposit and your yield — which is exclusively composed of the token you deposited. \
To view the value of your deposit and earned yield in the specific token, click the 'T' button in the top right corner of the page.

<figure><img src="/files/utH9dojTkDCOXDojBsjI" alt=""><figcaption></figcaption></figure>

#### **3) Why is the supply APY different across USDC and SOL lending pools?**

For a given token (such as USDC or SOL), multiple lending pools can exist. The Main lending pool exclusively funds positions opened on Main markets. Isolated lending pools, on the other hand, only fund borrowers from their specific isolated market.

Because isolated lending pools serve a smaller number of borrowers, their utilization rate, and therefore their supply APY, tends to fluctuate more than the Main lending pool.

{% hint style="warning" %}
At equal utilization, isolated lending pools may offer a higher supply APY than the Main pool. This reflects the additional risk taken on by lenders, as isolated markets and their underlying tokens are generally considered riskier.
{% endhint %}


# Create a New Market

DefiTuna allows users to create permissionless markets.

* Navigate to [https://defituna.com](https://defituna.com/). By default, you will land on the **Markets** section.
* Click the **Connect Wallet** button (the purple icon at the top of the page) and follow the prompts to connect the wallet you’d like to use.
* Click on **Create Market**, or directly on the **+** button in the header next to Markets.

### DefiTuna offers two market types:

* **Standard** — Create a market without leverage. \
  Supports both concentrated and full-range positions. \
  No deposit is required to create the market
* **Leveraged** *(Advanced)* — Create a market with up to 5x leverage (for both traders and liquidity providers). \
  It requires an initial full-range, permanently locked position.\
  A minimum deposit of $10 of each token is required in order to create the market.

{% hint style="info" %}
Creating a leveraged market will also create isolated lending pools for both the base and quote tokens.
{% endhint %}

{% hint style="warning" %}
If you are the market creator (Standard markets included), a leverage scale widget will appear once the pool is created meaning you'll be able to increase or decrease leverage over time, as long as you meet the full-range and locking requirements.
{% endhint %}

***

Follow these steps to create a market:&#x20;

* **Select your market type** — then **set your token** pair using each token's name or mint address.
* Click **Choose Market Type** to proceed.

{% hint style="info" %}

* **Set the initial price** — Enter the initial price for your token pair. Make sure it matches the current market price, given by Jupiter, to avoid losing initial liquidity to arbitrage.\
  A warning will appear if your input deviates by more than 2% from the current price.
* **Set the initial fee tier** — Choose the fee rate that best fits your token pair's expected volatility. Lower fees are generally better suited for stable pairs, while higher fees are more appropriate for volatile ones.
* **Set your initial position**&#x20;
  1. **For Standard markets**, you can choose between a full-range or concentrated position.&#x20;
  2. **For Leveraged markets**, you must deposit a minimum amount of TVL in your initial position to enable leverage.
* **Review and confirm** — Carefully review all parameters before submitting. Once the market is created, some parameters cannot be changed.
* Click **Create Market** and approve the transaction in your wallet. Your market is now live.
  {% endhint %}


# Understanding Pseudo-Delta Neutral Liquidity Provision

## 1. Background

In classical option theory, a delta-neutral portfolio is one whose value does not change for infinitesimal moves in the underlying asset price (see \[[5](#references)]). For instance, by shorting a call option and holding an appropriate quantity of the underlying asset, a trader can offset first-order price risk (delta), leaving only higher-order sensitivities (gamma, vega). The essential idea is to construct a portfolio that earns time value (the option premium) while remaining hedged against small price fluctuations.

A similar logic applies in concentrated liquidity market makers. When an LP provides liquidity in a narrow price band, the token composition of their position changes as the pool price evolves (see \[[3](#references)]). This changing composition creates an implicit delta. Below the entry price, the position accumulates more of the risky asset, e.g., SOL, and, above the entry price, it accumulates more of the stablecoin, e.g., USDC. By borrowing SOL or USDC (or both) against collateral, an LP can offset their initial token exposure at the entry price, effectively constructing a pseudo-delta-neutral position. At inception, the portfolio has zero net exposure to SOL price movements, so the LP expects to earn from fees rather than directional bets. However, as in options, this neutrality is not preserved dynamically. As the price deviates from the entry level, exposure reappears due to gamma, which in derivatives terminology refers to the rate at which delta changes with respect to the underlying price (see \[[5](#references)]). For this reason, the strategy is often described as short gamma. The LP collects fees while holding a position whose value curve is concave in price. Inpractice, this means earning yield in calm markets but suffering losses when volatility increases, i.e., harvesting fees in exchange for bearing convexity risk (see \[[4](#references)]).

## 2. Model setup

We consider the pair SOL/USDC, where the pool price *P* denotes the number of USDC required to buy one unit of SOL. The LP allocates capital into a finite band \[*p*<sub>*ℓ*</sub>*, p*<sub>*u*</sub>] within which liquidity is active. This feature allows capital to be concentrated where trading is expected, increasing fee yield relative to the same notional deployed in a constant-product AMM (see \[[1, 2](#references)]).

If LP contributes liquidity units *L* over the band \[*p*<sub>*ℓ*</sub>*, p*<sub>*u*</sub>], then at any price *P*  \[*p*<sub>*ℓ*</sub>*, p*<sub>*u*</sub>] the position consists of a specific number of SOL tokens *x* and USDC tokens *y*. These amounts are determined by the geometry of the Uniswap v3 liquidity curve:

$$
x=L\times(\frac{1}{\sqrt{P}} - \frac{1}{\sqrt{p\_{u}}} ) \quad\quad\quad\quad\quad\text{(2.1)}
$$

$$
y=L\times(\frac{1}{\sqrt{P}} - \frac{1}{\sqrt{p\_{l}}} ) \quad\quad\quad\quad\quad\text{(2.2)}
$$

Equation (2.1) states that the SOL holdings shrink as price rises toward *p*<sub>*u*</sub>, while equation (2.2) shows that USDC holdings grow as price rises above *p*<sub>*ℓ*</sub>. Intuitively, inside the band the portfolio is a continuously rebalanced mixture of SOL and USDC, and outside the band it collapses into a single asset (all SOL below *p*<sub>*ℓ*</sub>, all USDC above *p*<sub>*u*</sub>). The dollar value of the position at price *P* is then:

$$
V=P\times x+y \quad\quad\quad\quad\quad\quad\quad\text{(2.3)}
$$

This is the gross notional, i.e., the market value of the position before accounting for leverage or debt. Let *D*<sub>SOL</sub> denote the borrowed SOL (marked at price *P* ) and *D*<sub>USDC</sub> the borrowed USDC. The equity value of the LP is, therefore, the net of asset value minus debts:

$$
E=V-(D\_{SOL}\times P+D\_{USDC}) \quad\quad\quad\text{(2.4)}
$$

Equation (2.4) makes explicit that leverage increases *V* relative to the LP’s own capital, but simultaneously introduces repayment obligations that increase with price in the case of SOL borrowing.

To measure LP’s exposure, we compute the sensitivity of equity to small changes in the price of SOL. Differentiating equation (2.4) with respect to *P* yields:

$$
\Delta=\frac{\delta
E}{\delta
{P}}=\frac{\delta
V}{\delta
{P}}-D\_{SOL}\quad\quad\quad\quad\text{(2.5)}
$$

Expanding the derivative of V as:

$$
\frac{\delta
V}{\delta
{P}}=\frac{\delta(P\times
x+y)}{\delta
{P}}=x+P\times\frac{\delta
x}{\delta
{P}}+\frac{\delta
y}{\delta
{P}}=x-P\times\frac{L}{2\times P^{3/2}}+\frac{L}{2\times P^{1/2}}=x \quad\text{(2.6)}
$$

Therefore, the equity delta is:

$$
\Delta=\frac{\delta
E}{\delta
{P}}=x-D\_{SOL}\quad\quad\quad\quad\text{(2.7)}
$$

This equation shows that the LP’s net dollar exposure comes entirely from the difference between SOL held through the CLMM position and SOL owed due to leverage. The LP’s position is delta-neutral *if and only if* these two quantities offset, i.e., *D*<sub>SOL</sub> = *x*. Inother words, the LP borrows exactly as much SOL as the CLMM position holds at the current price *P* . At that moment, small upward or downward moves in SOL have no first-order effect on equity. This mirrors the construction of delta-neutral hedge strategy in option theory, but here the mechanism is implemented directly on-chain by combining CLMM with borrowed assets.

## 3. Numerical example

To make the abstract formulas concrete, let us work through a detailed numerical example of how a pseudo-delta-neutral position is constructed inside a CLMM. We take the SOL/USDC pair as a case study. All values are in USDC unless otherwise noted.

* Current spot price: *P*<sub>0</sub> = 200 USDC per SOL.
* Price band: \[*p*<sub>*ℓ*</sub>*, p*<sub>*u*</sub>] = \[19&#x30;*,* 210] (a *±*&#x35;% band around spot).
* Equity capital (own funds): *E*<sub>0</sub> = 100.
* Target leverage: *λ* = 3, so total gross notional exposure is *N*<sub>0</sub> = 300 and borrow amount is 200.

***Step 1. Liquidity calibration.*** The first step is to find how many units of CLMM liquidity *L* must be minted so that the gross value of the pool position equals the target *N*<sub>0</sub> = 300 at the entry price *P*<sub>0</sub> = 200. \
The position value at price *P* is:

$$
V=P\times x+y=L \times (2 \times \sqrt{P}-\sqrt{p\_{l}}-\frac{
P}{\sqrt
{p\_{u}}})
$$

Substituting *P* = 200, *p*<sub>*ℓ*</sub> = 190, *p*<sub>*u*</sub> = 210:

$$
V=L\times(2\times\sqrt{200}-\sqrt{190}-\frac{
200}{\sqrt
{210}})=300
$$

gives *L* ≈ 42&#x39;*.*&#x36;. Once *L* is known, we can calculate the actual asset composition at entry using equations (2.1) and (2.2):

$$
x≈0.73\quad SOL, \quad\quad y≈153.9\quad USDC
$$

This means that the CLMM deposit holds about 0.73 SOL and 154 USDC at the entry price. The combined market value is 300, as desired.

***Step 2. Debt allocation for neutrality.*** The leverage comes from borrowing assets. Here, the LP borrows 200 of notional, while contributing 100 of their own funds. To achieve delta-neutrality at inception, the borrow amount is structured so that the SOL debt offsets the SOL held inside the CLMM. Since *x* = &#x30;*.*&#x37;3 SOL, we set *D*<sub>SOL</sub> = *x =* &#x30;*.*&#x37;3. This ensures that the LP is short in SOL (via debt) exactly the same amount that the CLMM position is long in SOL. The remaining debt capacity is taken in USDC to reach the total borrow notional of 200:

$$
D\_{USDC}= 200 − P \times D\_{SOL} = 200 − 200 \times 0.73 ≈ 54
$$

Thus, the liabilities are short in 0.73 SOL and short in 54 USDC.

***Step 3. Equity check at entry.*** At *P*<sub>0</sub> = 200, the asset side is &#x30;*.*&#x37;3 SOL (146 USDC) plus 15&#x33;*.*&#x39; USDC, i.e., 300. The liability side is &#x30;*.*&#x37;3 SOL debt (146 USDC) plus 54 USDC debt, i.e., 200. Equity is *E* = 300 *−* 200 = 100, which matches the LP’s own capital. Moreover, the delta is ∆ = *x − D*<sub>SOL</sub> = &#x30;*.*&#x37;3 *−* &#x30;*.*&#x37;3 = 0, so the position is *exactly delta-neutral at inception*.

## 4. Case analysis - price evolution

Now let us examine what happens as the price moves. The CLMM composition changes automatically, while the debt obligations evolve linearly with price (for the SOL debt) or stay constant (for the USDC debt). We compute both equity and net exposure in three cases.

***Case A. Price unchanged (P*****&#x20;= 200*****).**&#x20;*&#x20;Nothing changes. Equity remains 100, and delta is still 0. This is the ideal point, the LP has no directional exposure and collects fees while neutral.

***Case B. Price falls to P*****&#x20;= 190&#x20;*****(the lower bound).***  At the lower band edge, all capital is converted into SOL as:

$$
x≈ 1.52, \quad\quad y=0,\quad\quad V≈ 288.5
$$

Debt obligations are &#x30;*.*&#x37;3 *·* 190 + 54 = 19&#x33;*.*&#x37;. Thus, the equity is:

$$
E = 288.5 − 193.7 = 94.8
$$

Equity has dropped below the starting 100, a sign of impermanent loss. The net SOL exposure is:

$$
x − D\_{SOL} = 1.52 − 0.73 = 0.79 \quad SOL
$$

meaning the LP is now long nearly 0.8 SOL unhedged. The intuition behind this is as price falls, the CLMM makes you accumulate more SOL, but the SOL debt remains fixed, so you end up net long.

***Case C. Price rises to P*****&#x20;= 210&#x20;*****(the upper bound).*** At the upper edge, all capital is converted into USDC:

$$
x=0, \quad\quad y≈303.7,\quad\quad V≈ 303.7
$$

Debt is &#x30;*.*&#x37;30 *·* 210 + 54 = 20&#x37;*.*&#x33;. Hence, the equity is:

$$
E = 303.7 − 207.3 = 96.4
$$

Equity again drops below 100. Net SOL exposure is:

$$
x − D\_{SOL} = 0 − 0.73 = −0.73\quad SOL
$$

This means that the LP is now net short SOL, since they owe SOL but no longer hold any inside the CLMM.

***Case D. Liquidation.*** Once price leaves the band, the CLMM position freezes. Thus, below 190 it holds a constant *x*<sub>const</sub> in SOL, above 210 it holds a constant *y*<sub>const</sub> in USDC. The downside liquidation occurs below the lower edge when the amount held in SOL. Thus,the LP always holds 1.525 SOL once price falls past 190, but continues to owe 0.73 SOL. The danger of liquidation is when the equitydrops below the required maintenance threshold. With a maintenance margin *θ* = &#x30;*.*&#x38;, the critical downside price is:

$$
P\_{liq,↓}=\frac{D\_{USDC}}{\theta\times x\_{const}-D\_{SOL}} ≈  \frac{54}{0.8\times 1.525-0.73} ≈  110
$$

Therefore, liquidation occurs near *P* = 110. This is far below the entry, but not impossible if a sharp bear move occurs.

Upside liquidation occurs above the upper edge when the position is frozen in USDC: In this region, the LP holds only USDC *≈* 30&#x33;*.*&#x37;, while still owing *D*<sub>SOL</sub> = &#x30;*.*&#x37;3 SOL. As the price of SOL rises, the USDC value of this SOL liability increases linearly as *D*<sub>SOL</sub> x *P*. Liquidation occurs when the total debt reaches the maintenance fraction *θ* of assets, the critical upside price is:

$$
P\_{liq,↑}=\frac{\theta \times y\_{const}-D\_{USDC}}{D\_{SOL}} ≈  \frac{0.8\times303.7-54}{0.73} ≈  259
$$

Thus, on the upside, liquidation would occur if the SOL price rises above roughly 259. In practice, equity starts eroding as soon as *P >* 210 because the position is frozen in USDC while the SOL liability grows. Here, proactive rebalancing is advisable well before the liquidation boundary.

At first sight, one might conclude that upside liquidation risk is negligible. However, this interpretation is misleading, because liquidation is only the terminal boundary where equity reaches the maintenance margin. In practice, the position becomesunattractive long before that point due to equity erosion and leverage amplification.

* **Equity erosion:** When *P > p*<sub>*u*</sub> = 210, the CLMM position is frozen in USDC (*y*<sub>const</sub> *≈* 30&#x33;*.*&#x37;). The debt obligations, however, still include a fixed short position of *D*<sub>SOL</sub> = &#x30;*.*&#x37;3 SOL. As the SOL price increases, the USDC value of this liability growslinearly, while the asset side remains constant. Consequently, equity declines steadily with every dollar increase in *P* .
* **Leverage spikes:** Leverage is defined as gross notional over equity. Once equity falls, leverage rises even if the debt is unchanged. In this example, at *P* = 250 the equity has dropped to 6&#x36;*.*&#x37;, while the gross position is still around 303. Effective leverage, therefore, jumps from 3 at inception to more than &#x34;*.*&#x35; at *P* = 250. As *P* increases further, leverage escalates rapidly, amplifying both funding costs and sensitivity to adverse moves.

Note that liquidation prices should not be read as safe buffers. They only indicate the extreme boundary where a protocol enforces closure. From a risk management perspective, LPs should monitor equity erosion and leverage ratios continuously and take action (close, repay debt, or re-center liquidity) as soon as equity drawdown becomes material. In leveraged CLMM strategies, *waiting until liquidation is triggered is rarely rational*, because by then most of the LP’s initial capital has already been consumed by debt growth. Rebalancing well before the theoretical liquidation point is, therefore, essential to preserve LP’s capital.

<figure><img src="/files/dCDIvIfGxMxhlutj5wNY" alt=""><figcaption><p>Figure 4.1: Pseudo-delta-neutral position</p></figcaption></figure>

Figure 4.1 depicts equity trajectory of the leveraged CLMM position across different price scenarios. It illustrates three cases: inside the active range (190  *P*  210), below the lower bound (*P <* 190) where assets are frozen in SOL, and above the upper bound (*P >* 210) where assets are frozen in USDC. As the price deviates from the entry point *P*<sub>0</sub> = 200, equity gradually erodes. On the downside, liquidation risk emerges around *P*  110, while on the upside it emerges around *P*  259. The slope of the curve beyond the active range corresponds to the constant exposure in the frozen asset versus the debt liability. This visualization makes explicit how equity evolves and why rebalancing is required long before formal liquidation.

## 5. Interpretation

The leveraged CLMM construction is conceptually equivalent to a delta-hedged derivatives position in classical finance. In option theory, a portfolio is delta-neutral when the first-order sensitivity of its value to the underlying vanishes. This is achieved by taking an offsetting position in the underlying asset against options exposure. Similarly, in the CLMM, the neutrality at inception is achieved by *borrowing precisely* the amount of SOL that equals the pool’s SOL holdings, so that ∆ = 0 at the entry price *P*<sub>0</sub>. However, delta neutrality in this context is *only local*. The curvature of the equity function *E* with respect to price is governed by the gamma of the CLMM position. Differentiating the equity delta in equation (2.7) with respect to the price *P* yields the gamma:

$$
\Gamma =\frac{\delta\Delta}{\delta
{P}}=\frac{\delta x}{\delta
{P}}=-\frac{L}{2}\times P^{-3/2}<0
\quad for \quad P∈(pℓ,pu) \quad\text{(5.1)}
$$

In derivatives terminology, gamma measures how quickly delta changes as the price moves (see \[[5](#references)]). A portfolio with positive gamma adjusts its sensitivity to price movements in a way that favors the investor. If the price rises, the portfolio’s delta increases, meaning the position becomes more long and captures additional upside. If the price falls, the delta decreases and becomes more negative, so the position shifts short and gains from the downside move. In both directions, the portfolio automatically tilts in the direction of the prevailing trend. In contrary, a portfolio with negative gamma adjusts in the opposite, disadvantageous way. When prices rise, its delta turns increasingly short, so the position loses more as the upward price movement persists. When prices fall, its delta turns increasingly long, so the position accumulates losses as the decline deepens. Negative gamma, therefore, erodes neutrality and makes the portfolio vulnerable to volatility in either direction.

In CLMM, a negative gamma means that the equity curve *E* as a function of price is concave as depicted in figure 4.1. It peaks atthe entry price *P*<sub>0</sub> and bends downwards on both sides. This concavity explains why the position is only neutral at inception. As soon as the price drifts away from *P*<sub>0</sub>, the delta shifts, positive below *P*<sub>0</sub>, negative above *P*<sub>0</sub>—and the position accumulates directional exposure. \
The directional consequences are:

* **For&#x20;*****P < P***<sub>**0**</sub>, the CLMM amount *x* increases as the pool converts into more SOL, while the SOL debt remains constant. The equity delta, therefore, becomes positive, leaving the LP net long SOL and exposed to further downside moves.
* **For&#x20;*****P > P***<sub>**0**</sub>, the CLMM amount *x* decreases and eventually vanishes, but the SOL debt remains fixed. The equity delta becomes negative, leaving the LP net short SOL and exposed to further upside rallies.
* **Outside the range \[*****p***<sub>***ℓ***</sub>***, p***<sub>***u***</sub>**]**, the CLMM amounts freezes into a constant token vector (*x*<sub>const</sub>*,* 0) or (&#x30;*, y*<sub>const</sub>). The net exposure then plateaus at a constant long or short SOL position, and the liquidation threshold depends on the interaction between this frozen position and the debt vector (*D*<sub>SOL</sub>*, D*<sub>USDC</sub>). This dependence has been formalized in continuous-time models as a solvency condition linking leverage, band width, and volatility (see \[[4](#references)]).

In summary, a pseudo-delta-neutral leveraged CLMM strategy is *not riskless*. It mirrors a delta- hedged but short-gamma derivatives position, meaning, locally *hedged at inception*, maximized at the entry price, but *increasingly vulnerable to volatility as the underlying drifts*. Fee income must be sufficient to compensate for both funding costs and the expected convexity drag, or the strategy becomes unprofitable.

## References

\[1]     Adams, H., Zinsmeister, N., Salem, M., Keefer, R., & Robinson, D. (2021). *Uniswap v3 Core*. White paper.

\[2]   Elsts, A. (2021). *Liquidity Math in Uniswap v3*. Technical Note.

\[3]    Elsts, A., & Klas, K. (2023). *Concentrated Liquidity with Leverage*. Working paper.

\[4]   Tung, S.-N., & Wang, T.-H. (2024). *A Mathematical Framework for Modelling CLMM Dynamics in Continuous Time*. Working paper.

\[5]    Hull, J. C. (2018). *Options, Futures, and Other Derivatives* (10th ed.). Pearson.


# Understanding Impermanent Loss

**What Is Impermanent Loss (IL)?**

When providing liquidity, Impermanent Loss (IL) occurs when the value of your assets in a liquidity pool changes compared to simply holding them in your wallet. This happens because of price movements between the paired tokens in the pool. While liquidity provision generates fees and rewards, the divergence in token prices can lead to lower returns than expected – this is the impermanent loss.

The term “impermanent” is used because the **loss isn’t realized until you withdraw your liquidity.** If prices realign to their original ratio, the loss can disappear. However, this also means that if you **withdraw at an unfavorable price ratio, the loss becomes permanent.**

<mark style="color:red;">**RULE 1: IL is fixed only once position is closed**</mark>

***

#### **IL as Part of the PnL Equation** <a href="#il-as-part-of-the-pnl-equation" id="il-as-part-of-the-pnl-equation"></a>

Your overall PnL in liquidity provision consists of 3 components:

* **Yield Earned:** Rewards from providing liquidity.
* **Token Price Movement:** The appreciation or depreciation of the tokens in your position.
* **Impermanent Loss:** The reduction in value due to price divergence between tokens in the pool.

When users focus only on fees earned and token appreciation, they often overlook the IL component. This can make the position appear profitable when, in fact, the net returns are lower due to IL.

<mark style="color:red;">**RULE 2: Liquidity Farming has non-linear PnL**</mark>

***

#### **Long Is ONLY Long, Short Is ONLY Short Within the Range**  <a href="#long-is-only-long-short-is-only-short-within-the-range" id="long-is-only-long-short-is-only-short-within-the-range"></a>

In DefiTuna, positions operate within a specific price range. Here’s what that means:

* A **position with a** [**long setup**](/learn-more/how-to-open-different-lp-strategies/long-farming) benefits from token appreciation but only within the active range. Once the price exits the range, the position effectively “freezes.” No new fees are earned, and the unrealized IL is locked in.
* A **position with a** [**short setup**](/learn-more/how-to-open-different-lp-strategies/short-farming) works the opposite way but is similarly constrained by its range.

Many users mistakenly believe they are making money as token prices move favorably within the range. However, if the price moves out of range, the position stops earning, and any gains could be eroded by IL upon exit.

<mark style="color:red;">**RULE 3: Out-of range positions brings nothing but IL**</mark>

***

#### **Leverage and Its Effect on IL** <a href="#leverage-and-its-effect-on-il" id="leverage-and-its-effect-on-il"></a>

* **Amplification of Exposure:** Leverage magnifies both gains and losses. In the context of liquidity provision, this means that any price movement between the paired tokens has a multiplied effect on your position. If the tokens diverge in price, the impermanent loss is amplified in proportion to the leverage.
* **Higher Funding:** Leveraged positions typically involve borrowing assets, which adds to your overall costs. If the IL is already reducing your returns, the additional funding can turn a seemingly profitable position into a loss.
* **Margin Pressure:** In leveraged setups, IL can reduce your position's value to the point where margin requirements are no longer met. This could lead to forced liquidation, turning unrealized losses into realized ones.

<mark style="color:red;">**RULE 4: Leverage amplifies your IL**</mark>

***

#### Practical Considerations <a href="#practical-considerations" id="practical-considerations"></a>

* **Choose Wider Ranges for Stability:** A wider range reduces the sensitivity to price movements and mitigates IL, though it may lower your fee earnings.
* **Use Conservative Leverage:** Lower leverage minimizes the amplification of IL and gives you more room to manage your position without being forced to close.
* **Monitor Constantly:** With both leverage and narrow ranges, continuous monitoring is essential to avoid adverse outcomes.


# How to open different LP strategies

{% content-ref url="/pages/0TFevo84JRTlz2IJN1M8" %}
[Position opening](/learn-more/how-to-open-different-lp-strategies/position-opening)
{% endcontent-ref %}

{% content-ref url="/pages/jqR6j51uTBzSrXiU8EIE" %}
[Long Farming](/learn-more/how-to-open-different-lp-strategies/long-farming)
{% endcontent-ref %}

{% content-ref url="/pages/9mjReQApfNLlqG4ksH3G" %}
[Short Farming](/learn-more/how-to-open-different-lp-strategies/short-farming)
{% endcontent-ref %}

{% content-ref url="/pages/tcY7L22o0evrnyMwGBTG" %}
[Neutral Farming](/learn-more/how-to-open-different-lp-strategies/neutral-farming)
{% endcontent-ref %}


# Position opening

1. **Connect your wallet.**

<figure><img src="/files/83Py22RM6EYrqRF0zDRS" alt=""><figcaption></figcaption></figure>

2. **Go to the "**[**Provide Liquidity**](https://defituna.com/lp)**" section.**

<figure><img src="/files/Q4d4GbTcslkkdetLXaIh" alt=""><figcaption></figcaption></figure>

3. **Select a Pool.** I wil proceed with DefiTuna SOL/USDC liquidity pool.\
   You can filter markets by type (Main, Isolated, or Favourites), by pool provider (DeFiTuna or Orca), or choose to display leveraged markets only.

<figure><img src="/files/MZvvd5aMeTfUlSggrej9" alt=""><figcaption></figcaption></figure>

4. **Deposit margin in any token you prefer.** The protocol will automatically perform a swap to match the required deposit ratio if needed, so this only affects the swap amount, not the position itself.\
   You can also deposit both tokens simultaneously, especially if you choose to "**Disable swap"**.\
   In this example, I used 100 USDC.

<figure><img src="/files/xAwZHMNrGP0H8DbVr3xT" alt=""><figcaption></figcaption></figure>

5. **Decide whether to enable Leverage.** If you choose to disable it, you can skip to step 8.\
   In this example, I will enable leverage.
6. **Choose leverage.** How much do I want to amplify my liquidity position? Higher leverage means more liquidity added and consequently more fees earned.\
   I set leverage to 3x, which means $200 will be borrowed and added to my $100, making my total position $300.\
   This allows me to earn up to 3x more fees compared to farming with just my initial $100.

<figure><img src="/files/hbcxcgV5ff4Saz9XhMLY" alt=""><figcaption></figcaption></figure>

7. **Select which tokens to borrow to increase your position** — this is called the borrow ratio. By default, it’s set to 50/50, meaning the debt is evenly split between SOL and USDC.\
   This ratio determines your [directional exposure](broken://pages/FZRCMQXfnK4oUOdazCYQ) (represented by the red arrow) and allows you to create "[Short](/learn-more/how-to-open-different-lp-strategies/short-farming)", "[Long](/learn-more/how-to-open-different-lp-strategies/long-farming)", or "[Neutral](/learn-more/how-to-open-different-lp-strategies/neutral-farming)" positions based on your market outlook:

* If I expect SOL to rise, I borrow more USDC to benefit from SOL's appreciation.
* If I expect SOL to fall, I borrow more SOL, so I can buy it back cheaper later and profit from the drop.
* If I expect SOL to remain stable, I borrow both tokens equally.

In this example, borrowing USDC at a 75/25 ratio gives me a "Semi-Long" exposure.

{% hint style="warning" %}
"Short" and "Neutral" strategies are not fully effective with low leverage (below 2x).
{% endhint %}

<figure><img src="/files/m7oDMI91InErPkv9nhWJ" alt=""><figcaption></figcaption></figure>

8. **Select your range.** It defines the lower and upper price limits within which you are depositing liquidity and farming yield, similar to how it’s done on platforms like Orca, Raydium, or Meteora.

* Narrow ranges can earn higher fees but require more frequent rebalancing.
* Wider ranges generate lower fees but need less maintenance.

{% hint style="info" %}
If the price moves outside your selected range, your position will no longer earn fees and may be exposed to greater [impermanent loss](/learn-more/understanding-pseudo-delta-neutral-liquidity-provision).
{% endhint %}

<figure><img src="/files/UtA79fOukrYdFSjnJcPT" alt=""><figcaption></figcaption></figure>

9. **Consider your liquidation carefully.**\
   If your liquidation price is set too far from the current price, you may lose capital efficiency.\
   If it’s too close, or worse, within your range, it becomes risky.

* Borrowing a single token (e.g., a 100/0 ratio) results in one liquidation point.
* Borrowing both tokens creates two separate liquidation points: one for each borrowed asset.

Your borrow ratio, leverage, and price range all directly influence where these liquidation points are placed. Adjust them thoughtfully to balance risk and efficiency.

<figure><img src="/files/5dJ7GLmPWkKzLAA2AHUO" alt=""><figcaption></figcaption></figure>

10. **Define your** [**limit orders**](/dive-into-defituna/provide-liquidity/platform-info/trigger-orders) **and swap preferences.**\
    In this example, I’m setting limit orders at the range bounds and choosing to swap to USDC for both orders.

<figure><img src="/files/BlpDmcsjtKy0NuqQ4DUC" alt=""><figcaption></figcaption></figure>

11. **You have the option to enable** [**auto-compounding**](/dive-into-defituna/provide-liquidity/platform-info/compound)**.**\
    In this example, I’ll auto-compound my yield and "Keep leverage".

<figure><img src="/files/lqp5wWQ33slJqK1uKGeW" alt=""><figcaption></figcaption></figure>

12. **Once everything is set, click the "Create Position" button to finalize your setup.**

<figure><img src="/files/JaPNGN1cE3c31htX80x6" alt=""><figcaption></figcaption></figure>

13. In the confirmation window, you’ll see the swap amount along with all your selected parameters. Review everything carefully, then **click "Start Farm'" to confirm the transaction in your wallet.**

<figure><img src="/files/b0PPDYuzRtkSoq7fbwOx" alt=""><figcaption></figcaption></figure>

14. If the transaction is successful, your position will appear under "**Opened Positions**". Take note of the available settings, which allow you to [monitor your position](/dive-into-defituna/provide-liquidity/onboarding/monitoring-opened-lp-positions) and toggle between token amounts and token values.

<figure><img src="/files/2Ak9ftoJtnp7McyCtpDj" alt=""><figcaption></figcaption></figure>


# Long Farming

### **What is "Long" Farming?**

Long farming is a strategy that lets you profit when the value of an asset increases. In this example, you borrow USDC to buy SOL and provide both as liquidity in a Liquidity Farming. If SOL’s price rises, it will sell at higher prices within the range you set, generating profits. Additionally, you earn trading fees while your position stays within the range.

Think of it as a limit order that also earns fees while waiting for the price to move.

***

#### **Long Exposure: Fully Adjustable on DeFiTuna**

DeFiTuna gives you complete control over your exposure. By adjusting parameters like price range, borrow ratio, and leverage, you can customize your position to match your goals —whether you want higher potential profits with more risk or a more balanced, safer position.

<figure><img src="/files/9NCA33I2r5pohajS3dcF" alt=""><figcaption></figcaption></figure>

#### **Key Parameters to Manage Long Exposure**

1. **Deposit Ratio**
   * This is how much of your position consists of SOL.
   * Higher deposit ratios increase your exposure to SOL.
   * For instance, creating an out-of-range position with a 100% deposit ratio of SOL allows you to maximize your exposure.
2. **Range**
   * The price range determines where your SOL will be sold.
   * Setting a higher maximum price means your SOL will sell for more, but it may take longer to reach that price.
   * A wider range can also reduce fee-earning efficiency. Think of it as a balance between fee generation and the appreciation of your collateral.
3. **Borrow Ratio**
   * Borrowing more USDC increases your exposure to SOL.
   * If you allocate 100% of the borrowed USDC to purchasing SOL (through a 100%/0% deposit ratio), you maximize your position’s growth potential.
4. **Leverage**
   * Leverage allows you to increase the size of your position by borrowing additional funds.
   * Higher leverage can amplify your profits if the price moves in your favor but also increases your risk.

{% hint style="info" %}
To reduce the risk of liquidation, you can borrow more SOL, lower your leverage, and set up [limit orders](/dive-into-defituna/provide-liquidity/platform-info/trigger-orders).
{% endhint %}

<figure><img src="/files/0lLHch1cfFq1Fvmi6W1v" alt=""><figcaption></figcaption></figure>

#### Advanced Tip: Boost Profits Through [Auto-Compounding](https://app.gitbook.com/o/dNJbZ5r3exVREI6Gzxls/s/MyF9WLf9iWl1sLBOWmVE/~/changes/133/dive-into-defituna/provide-liquidity/platform-info/compound#auto-compounding). <a href="#advanced-tip-boost-profits-through-compounding" id="advanced-tip-boost-profits-through-compounding"></a>

***

#### Important Note: <a href="#important-note" id="important-note"></a>

When your position goes out of range, you stop benefiting from further price increases. Ensure that your range is well-optimized for the expected market movement.

***

#### **Final Reminder:** <a href="#final-reminder" id="final-reminder"></a>

This setup is a powerful way to grow your portfolio during Bull Market, but it requires careful planning and risk management. Use DefiTuna’s flexible tools to adjust your position, align it with your goals, and ensure sustainable growth.


# Short Farming

### **What is "Short" Farming?**&#x20;

Short farming is a strategy that lets you profit when the price of an asset decreases. In this example, you borrow SOL to sell it for USDC and provide both as liquidity in a Liquidity Farming. If SOL’s price falls, it will be bought back at lower prices within the range you set, generating profits. Additionally, you earn trading fees while your position stays within the range.

Think of it as **a limit order that also earns fees while waiting for the price to move**.

***

#### Short Exposure: Fully Adjustable on DefiTuna <a href="#short-exposure-fully-adjustable-on-defituna" id="short-exposure-fully-adjustable-on-defituna"></a>

DefiTuna allows you to control how much exposure you have to the market. By adjusting parameters like price range, borrow ratio, and leverage, you can create a position that matches your market outlook — whether you prefer higher potential returns with increased risk or a safer, more moderate approach.

<figure><img src="/files/Ibgj2JR6eQayKeipbbgA" alt=""><figcaption></figcaption></figure>

#### Key Parameters to Manage Short Exposure <a href="#key-parameters-to-manage-short-exposure" id="key-parameters-to-manage-short-exposure"></a>

1. **Deposit Ratio**
   * This is how much of your position consists of USDC.
   * Higher deposit ratios increase your exposure to the strategy.
   * For example, creating an out-of-range position with a 100% deposit ratio of USDC maximizes your short exposure.
2. **Range**
   * The price range determines when your borrowed SOL will be repurchased.
   * Setting a lower minimum price means SOL will be bought back for less, increasing your profits.
   * A wider range can reduce fee-earning efficiency. Think of it as a balance between fee generation and the appreciation of your collateral.
3. **Borrow Ratio**
   * Borrowing more SOL increases your exposure to the strategy.
   * If you choose to borrow 100% SOL, you maximize your potential profitability.
4. **Leverage**
   * Leverage allows you to increase the size of your position by borrowing additional funds.
   * Higher leverage can amplify your profits if the price moves in your favor but also increases your risk.

{% hint style="info" %}
To reduce the risk of liquidation, you can borrow more USDC, lower your leverage, and set up [limit orders](/dive-into-defituna/provide-liquidity/platform-info/trigger-orders).
{% endhint %}

<figure><img src="/files/1tLHH5gDE9MmAWghxxsN" alt=""><figcaption><p>Here, I've switched the PnL chart to display the "PnL in SOL".</p></figcaption></figure>

***

#### Advanced Tip: Boost Profits Through [Auto-Compounding](https://app.gitbook.com/o/dNJbZ5r3exVREI6Gzxls/s/MyF9WLf9iWl1sLBOWmVE/~/changes/133/dive-into-defituna/provide-liquidity/platform-info/compound#auto-compounding). <a href="#advanced-tip-boost-profits-through-compounding" id="advanced-tip-boost-profits-through-compounding"></a>

***

#### Important Note: <a href="#important-note" id="important-note"></a>

When your position goes out of range, you stop benefiting from further price decreases. Ensure that your range is well-optimized for the expected market movement.

***

#### **Final Reminder:** <a href="#final-reminder" id="final-reminder"></a>

Short farming is a powerful way to profit from declining prices during Bear Market, but it requires careful planning and risk management. Use DefiTuna’s flexible tools to adjust your position, align it with your goals, and ensure sustainable growth.


# Neutral Farming

### **What is "Neutral" Farming?** <a href="#what-is-neutral-farming" id="what-is-neutral-farming"></a>

Neutral farming is a strategy designed to minimize exposure to price movements while maximizing fee earnings. This is done by balancing your position between an asset like SOL and a stable asset like USDC. You borrow one asset, combine it with the other, and provide liquidity in a Concentrated Liquidity Automated Market Maker (CLAMM).

However, it’s important to note that **pure delta-neutral positions are impossible due to the nature of liquidity pools**. This strategy is better described as **pseudo delta-neutral**, as slight imbalances may occur. In practice, such positions function as a **short volatility strategy**, meaning you are effectively betting on the price staying within a narrow range. Delta-neutral farming offers a balanced risk-reward ratio, making it a compelling choice for stable returns.

<figure><img src="/files/a6aXX0epyvKuno03ipN2" alt=""><figcaption></figcaption></figure>

#### Key Characteristics of Delta-Neutral Farming <a href="#key-characteristics-of-delta-neutral-farming" id="key-characteristics-of-delta-neutral-farming"></a>

1. **Pseudo Delta-Neutral**
   * True neutrality isn’t achievable because liquidity pools naturally expose you to price movements. Instead, this strategy minimizes exposure by balancing borrowed and deposited assets.
   * The closer the price stays to the center of your range, the more effective this strategy becomes.
2. **Short Volatility**
   * This strategy profits from low market volatility.
   * Your main goal is to earn fees while the price remains stable within your range. If the price moves too far in either direction, your impermanent loss increases.
3. **Balanced Risk-Reward**
   * Delta-neutral farming doesn’t aim for large directional profits. Instead, it offers a consistent and relatively lower-risk way to earn fees.
   * Ideal for users looking for stability in volatile markets.

<figure><img src="/files/Zr1xGB8tn6bVkQjm81Id" alt=""><figcaption></figcaption></figure>

You can use the PnL calculator at the right of the TradingView chart to simulate how long you need to stay in range, to become fully profitable within the full range.

In this example, it will take approximately 3 days to reach full profitability.&#x20;

{% hint style="info" %}
Don’t forget to set up [trigger orders](/dive-into-defituna/provide-liquidity/platform-info/trigger-orders) to secure your profits and minimize potential losses.
{% endhint %}

<figure><img src="/files/vWrtdPi3LUQAtjFlzCuH" alt=""><figcaption></figcaption></figure>

#### How to Set Up a Delta-Neutral Position <a href="#how-to-set-up-a-delta-neutral-position" id="how-to-set-up-a-delta-neutral-position"></a>

1. **Set a Balanced Range**

* Choose a price range where you expect the market to remain stable.
* A tighter range generates more fees but increases the risk of the position going out of range.
* Aim for a balanced range with equal room on both sides. In the example above, there is a 5% buffer both to the downside and to the upside.

2. **Balance Your Borrow Ratio**

* Adjust your Borrow Ratio until the impermanent loss at the lower bound equals the impermanent loss at the upper bound, ensuring a symmetrical exposure on both sides.

3. **Leverage**

* Use moderate leverage to enhance your returns without introducing excessive risk.
* Be cautious, as higher leverage increase exposure if the price moves sharply.

{% hint style="warning" %}
This setup results in a position that is delta-neutral in USDC terms. \
If you want to be delta-neutral in SOL terms, click the button in the top header of the PnL chart (e.g., “PnL in SOL”) then adjust your borrow ratio until impermanent loss to the downside equals impermanent loss to the upside.&#x20;
{% endhint %}

<figure><img src="/files/enykvxjaUkjTvseuoGsf" alt=""><figcaption></figcaption></figure>

***

#### Advanced Tip: Boost Profits Through [Auto-Compounding](https://app.gitbook.com/o/dNJbZ5r3exVREI6Gzxls/s/MyF9WLf9iWl1sLBOWmVE/~/changes/133/dive-into-defituna/provide-liquidity/platform-info/compound#auto-compounding). <a href="#advanced-tip-boost-profits-through-compounding" id="advanced-tip-boost-profits-through-compounding"></a>

***

#### Important Notes <a href="#important-notes" id="important-notes"></a>

* **Risk of Range Breakout**: If the price moves outside your range, you stop earning fees and may be left holding an imbalanced position. Regular monitoring is essential.
* **Short Volatility**: This strategy is most effective in stable markets where prices are unlikely to move significantly. It works best when the price stays within the range you set.
* **Fees as Compensation**: While price exposure can’t be fully eliminated, the fees you earn help offset this risk and provide consistent returns.

***

#### **Final Reminder:** <a href="#final-reminder" id="final-reminder"></a>

Delta-neutral farming is not about chasing big profits—it’s about stability and consistent fee earnings, during Flat Market. By carefully balancing your position and monitoring your range, you can achieve a strategy that offers one of the most balanced risk-reward ratios in liquidity farming.


# Tokenomics

<figure><img src="/files/L1zqsETLO5vFfmPWaXUh" alt=""><figcaption></figcaption></figure>

<figure><img src="/files/aZFDbjaZKIcL27CzdRMh" alt=""><figcaption></figcaption></figure>

<figure><img src="/files/Mh7WHtKwY0TE0WzbOHhW" alt=""><figcaption></figcaption></figure>

<mark style="color:orange;">50% Treasury</mark> : DefiTuna will retain 50% of all tokens at launch (Treasury) and will lock them in the staking pool to participate in revenue sharing just like everyone else. This will ensure that the team can operate sustainably, grow the protocol, and continue innovating at the forefront of change.

<mark style="color:blue;">15.8% Investors</mark> :  Allocated to pre-seed and seed round investors.

10% Core Contributors : Reserved for early team members and advisors.

<mark style="color:green;">10% Liquidity Provision :</mark> To ensure sufficient liquidity exists on the open market both on DEX's as well as future CEX listings.

4.05% Initial Seed Liquidity : Tokens placed as concentrated liquidity and limit orders to jump-start the market. This liquidity will be available at starting prices on the open market for anyone to purchase.

5.00%  Initial Seed Liquidity (Pre-sale) : Token sale for Community members.

{% hint style="info" %}
“Initial Seed Liquidity (4.05%)” will be used either for a pre-sale event or simply as liquidity placed on our Fusion AMM for anyone to acquire at launch.\
“Liquidity Provision (10%)” will be used to ensure sufficient on-chain liquidity of the token.

This means that 14.05% will not be staked to compete for the revenue share.
{% endhint %}

#### **Token Economics:**

$TUNA is at the heart of Solana DeFi. All revenue generated by DefiTuna is distributed among $TUNA stakers in proportion to their share of the staking pool.

{% hint style="info" %}
Example:

$Tuna Lending TVL : 100,000,000 tokens

My Lending deposit : 10,000,000 $Tuna tokens

My share : 10% of the entire Lending pool

Revenue claim = 10% of all revenue.
{% endhint %}

#### Staking/Unstaking Cooldowns:

Newly staked $TUNA tokens begin generating revenue immediately upon being staked.\
After unstaking, $TUNA tokens require a 24-hour **Cooldown** period before they can be withdrawn.


# Stake $TUNA

1. Navigate to our staking page: <https://defituna.com/stake>.
2. Click the **Connect Wallet** button (purple icon at the top of the page) and follow the prompts to connect the wallet you want to use.\
   Make sure your wallet holds $TUNA tokens — if not, you can purchase some [here](https://defituna.com/trade?pool=AXB9KoFBT4ZxJgc4bHMYDgSkxjox6JuL3bbLBeL8LdSJ).
3. Once connected, click **Stake**, choose the amount you wish to stake, and confirm the transaction in your wallet.

{% hint style="info" %}
**“My Stake”** shows the number of tokens you’ve staked, along with their equivalent dollar value.

**“My Share”** represents the percentage of the total staking pool you currently own.

**“APR (Annual Percentage Rate)”** is calculated as the average of daily APR snapshots over the past 30 days.

**“Earned”** displays the amount of SOL you’ve accrued from protocol revenue sharing. You can either "**Claim"** these rewards or "**Compound"** them back into staking.
{% endhint %}

If you scroll down, you’ll see up-to-date analytics on the protocol’s **Total Revenue**.\
You can switch the display between SOL (by clicking the "**T"** button) and USD (by clicking the "**$"** button).\
You can also select a timeframe and hover over the chart to view specific values.

## Staking benefits

100% of protocol revenue is directed on-chain to a dedicated revenue pool. Token holders who stake $TUNA can claim a share of this revenue, proportional to the amount they stake.

**Example:**

* User A stakes 90 tokens
* User B stakes 10 tokens
* Pool revenue = $100,000
* User A receives $90,000
* User B receives $10,000

This structure is designed to be simple, transparent, and fair — just like everything else we’ve built at DefiTuna.

All protocol revenue is converted into $SOL and distributed to $TUNA stakers at least once per day. This ensures that rewards not only remain straightforward but also align with our long-term vision: being net long on the Solana ecosystem.

**In short, staking $TUNA is the most direct way to gain exposure to the future of Solana DeFi.**


# Whitepaper

{% file src="/files/mBPJa8QPWLpnlsP0Ccqm" %}


# Audits

**DefiTuna** and **FusionAMM** smart contracts have undergone comprehensive audits conducted by leading security firms such as SEC3, Torii Security, and Oshield.io, all of which are well-established in the Solana ecosystem.

{% content-ref url="/pages/yc0NBfVqZGtHXdfTmmP3" %}
[DefiTuna Audits](/security-and-risks/audits/defituna-audits)
{% endcontent-ref %}

{% content-ref url="/pages/qKXBFBDXsUvy7JVqVHY6" %}
[Fusion AMM Audits](/security-and-risks/audits/fusion-amm-audits)
{% endcontent-ref %}


# DefiTuna Audits

### 2025-01-27 [Torii Security](https://torii.team/)

{% embed url="<https://github.com/Torii-Security/audits/blob/main/solana/torii-defituna-report.pdf>" %}

### 2025-03-17 [SEC3](https://www.sec3.dev/)

{% embed url="<https://github.com/sec3-service/reports/blob/master/reports/sec3_defituna_final.pdf>" %}


# Fusion AMM Audits

### 2025-07-23 [SEC3](https://www.sec3.dev/)

{% file src="/files/axSXlpHcqHmPfS4aiVd0" %}

### 2025-07-25 [Oshield](https://www.oshield.io)

{% embed url="<https://github.com/oshieldio/Publications/blob/main/FusionAMM/FusionAMM.md>" %}


# Platform risks

**Legal:** Users accept and acknowledge both the "Terms of Use" and any "Disclaimer" provided by DefiTuna.

**Smart Contract Risks**: The Solana Mainnet remains in beta, which means smart contracts carry a potential risk of exploitation or malfunction. These risks are not exclusive to DefiTuna but also apply to any integrated platforms, including but not limited to Orca, Raydium and Pyth. \
To help mitigate these risks, DeFiTuna is currently undergoing multiple independent audits. All findings will be transparently published in our [Audits](/security-and-risks/audits) section.\
\
**Risk of Liquidation:** Borrowers understand and accept that their positions may be partially or fully liquidated if deemed too risky. \
DefiTuna does not guarantee that liquidations will occur in a timely manner. Similarly, limit orders are also not guaranteed to execute as expected.\
\
**Network Congestion:** During strong network Congestion or even a network halt , DefiTuna assumes no risks and guarantees on timely service. This means that users can experience loss caused but not limited to mispricing

**Oracle Risks:** DeFiTuna relies primarily on Pyth as its oracle provider. Any disruptions, inacurracy, or manipulation of the oracle feed may result in incorrect price data, potentially affecting user positions or leading to account freezes based on invalid data.

**Liquidation Mechanism:** As DefiTuna allows undercollateralised loans (more information can be found [here](/dive-into-defituna/provide-liquidity/platform-info/liquidations)), it employs a 24/7 liquidation bot that monitors all positions. \
To prevent bad debt in the Lending pool, the system will partially liquidate any positions identified as high-risk. Please refer to this page [here ](/dive-into-defituna/provide-liquidity/platform-info/liquidations)for detailed information about our liquidation process.

**Divergence Loss**: This occurs when token prices diverge from their initial deposit values, resulting in the liquidity being worth less than simply holding the tokens. \
High market volatility can worsen this effect, particularly in concentrated liquidity pools. \
For more information, you can refer to the [Uniswap team's blog post](https://pintail.medium.com/uniswap-a-good-deal-for-liquidity-providers-104c0b6816f2) or consult some of our internal resources [here](/learn-more/understanding-impermanent-loss).

**Lending Pool 100% Utilization Risk:** While the target utilization of the lending pool is set at 90%, there may be times when utilization spikes to 100%.\
At 90% the lending APY is set at 36%. To discourage full utilization, the APY for borrowers increases steeply to 160% at 100% utilization.\
While this results in significantly higher returns for lenders, it also means that all funds may be temporarily locked, preventing withdrawals until utilization decreases.

**Wallet providers**: DefiTuna is compatible with a wide range of wallets including Solfare, Phantom, Backpack, Jupiter, Glow, Brave, and Trust wallets. \
However, DefiTuna cannot protect users if the wallet provider they are use is compromised or exploited. Users are advised to conduct proper due diligence when selecting their wallet provider.


# Terms of Use

### Acceptance of Terms

By accessing or using the DefiTuna website (the "Site") and related services (the "Services"), you agree to be bound by these Terms of Use ("Terms"). If you do not agree to these Terms, do not use the Site or Services.

### Services Overview

DefiTuna enables users to provide liquidity with leverage on Orca pools. Users can open leveraged positions, borrowing tokens from lenders and paying APR based on fund utilization. All transactions are peer-to-peer and conducted via smart contracts.

### Eligibility

By using the Site and Services, you represent that you are at least 18 years old and have the legal capacity to enter into these Terms. The Services are not available to users in jurisdictions where such use is prohibited, including the United States and the United Kingdom.

### User Responsibilities

You are responsible for your actions and transactions on the Site. Ensure you understand the risks associated with leveraged positions, including the potential loss of all collateral. Always verify the URL and the legitimacy of the Site before connecting your wallet.

### No Warranties

The Site and Services are provided "as is" and "as available" without warranties of any kind. DefiTuna does not guarantee the accuracy, completeness, or reliability of the content. Use the Services at your own risk.

### Limitation of Liability

To the fullest extent permitted by law, DefiTuna is not liable for any indirect, incidental, special, punitive, or consequential damages arising from your use of the Site or Services.

### Privacy

Your use of the Site is subject to our Privacy Policy. By using the Services, you consent to the collection and use of your information as described in the Privacy Policy.

### Intellectual Property

All content on the Site is the property of DefiTuna or its licensors and is protected by intellectual property laws. You may not use, modify, or distribute any content without prior written consent.

### Changes to Terms

DefiTuna reserves the right to modify these Terms at any time. Changes will be effective immediately upon posting on the Site. Your continued use of the Services constitutes acceptance of the revised Terms.

### Governing Law

These Terms are governed by the laws of the jurisdiction in which DefiTuna operates, without regard to its conflict of law provisions.

### Contact Information

For any questions about these Terms, please contact us at [support@defituna.com.](mailto:support@defituna.com)


# Disclaimer

**Protocol and Interface**

This website-hosted user interface (this "Interface") is a software portal to the DefiTuna protocol, a decentralized and community-driven collection of blockchain-enabled smart contracts and tools (the "DefiTuna Protocol"). The DefiTuna Protocol facilitates peer-to-peer transactions and allows users to provide liquidity with leverage.

**Use at Your Own Risk**

THIS INTERFACE AND THE DEFI TUNA PROTOCOL ARE PROVIDED "AS IS," AT YOUR OWN RISK, AND WITHOUT WARRANTIES OF ANY KIND. The DefiTuna team does not provide, own, or control the DefiTuna Protocol or any transactions conducted on the protocol or via related smart contracts. By using or accessing this Interface or the DefiTuna Protocol, you agree that no developer or entity involved in creating, deploying, or maintaining this Interface or the DefiTuna Protocol will be liable for any claims or damages whatsoever associated with your use, inability to use, or your interaction with other users of, this Interface or the DefiTuna Protocol, including any direct, indirect, incidental, special, exemplary, punitive, or consequential damages, or loss of profits, digital assets, tokens, or anything else of value.

**Regulatory Restrictions**

The DefiTuna Protocol is not available to residents of the United States, the United Kingdom, and other jurisdictions where its use is prohibited. By using or accessing this Interface or the DefiTuna Protocol, you represent that you are not located in, incorporated or established in, or a citizen or resident of any such jurisdiction. You also represent that you are not subject to sanctions or otherwise designated on any list of prohibited or restricted parties or excluded or denied persons.

Risk of Leveraged Positions

Using leveraged positions involves significant risk, including the potential loss of all assets provided as collateral. Users should carefully assess their risk tolerance and seek independent advice if necessary. Leveraged positions can result in liquidation if the collateral value falls below the required threshold.

**Peer-to-Peer Interactions**

The DefiTuna Protocol enables peer-to-peer interactions for providing liquidity and borrowing assets. Users must understand the risks associated with such transactions, including counterparty risk and potential issues with the underlying smart contracts.

**No Guarantees**

The DefiTuna team makes no guarantees regarding the security, functionality, or availability of the Interface or the DefiTuna Protocol. Users are responsible for their actions and transactions and should thoroughly understand the technology and associated risks before engaging with the platform.

For further information, users should refer to the complete documentation available on the DefiTuna website and consult additional resources if needed.


# Brand Kit

Use the following guidelines in order to engage with our brand.

{% file src="/files/VFBnCSoARa7o2CV83eJO" %}

{% file src="/files/XrQG9f4VzOyOrvWq5qZg" %}

{% file src="/files/pbgOzBfaO5245WGty4ut" %}


# Contact

For any Business inquiries or special requests please contact : <support@defituna.com>&#x20;

Discord : <https://discord.com/invite/defituna>

X : <https://x.com/DeFiTuna>

Official Websites :&#x20;

* [https://defituna.com](https://defituna.com/)
* <http://fusionamm.com>


# SDK and Smart Contracts

Inside the Repository you will find latest IDL and up to date SDK that should enable you to build on top of DefiTuna. Documentation for DefiTuna SDK's can be found within the repository. For any questions or assistance please reach out on our Discord by opening a ticket.

[**GitHub Repository**](https://github.com/DefiTuna/tuna-sdk)

[**Solana Program Address**](https://solscan.io/account/tuna4uSQZncNeeiAMKbstuxA9CUkHH6HmC64wgmnogD#anchorProgramIdl)

For any special requests open a ticket on our Discord or via our website.


